Learn everything you need to and more regarding holographicdisplays on your Minecraft server rental in this article! HolographicDisplays also known as HD is a free spigot plugin that allows you to create floating messages made of text, items, or even pictures for players to look at! You can download this
Learn everything you need to and more regarding holographicdisplays on your Minecraft server rental in this article!
HolographicDisplays also known as HD is a free spigot plugin that allows you to create floating messages made of text, items, or even pictures for players to look at! You can download this plugin from this page. Once downloaded you can follow the instructions here to install the plugin on your server.
Once installing the plugin and restarting your server, run /holograms help and you should get a good list of commands. These are the only commands so there isn’t too much to learn. Documentation can be referenced here
Enter /holograms create MyFirstHologram I love minecraft or any other words and You should get something like the image below. You created a hologram at your location! Use /holograms list to see it in the list. You can move it to your location by entering /holograms movehere MyFirstHologram Finally, you can delete it by running /holograms delete MyFirstHologram

Editing a hologram is very useful. To edit our new text hologram. Enter /holograms edit MyFirstHologram From there you can click on what ever you need. For this example lets add a new line. Click on the first option or /holograms addline myfirsthologram <text> Remove the <text> part and replace it with some words. For my example I put my favorite server’s IP address You can also edit a line by entering /holograms setline myfirsthologram <lineNumber > <newText> for example /holograms setline myfirsthologram 2 ThisTextWasAdded

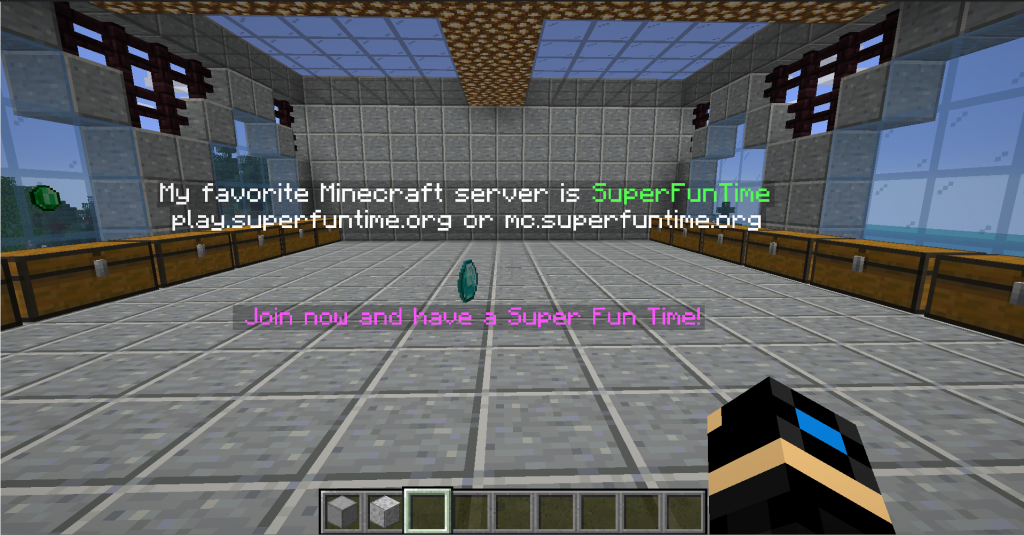
Color Codes are somewhat complicated. Heres a list Instead if using § you can use &. Lets edit our first line to say “My favorite Minecraft is SuperFunTime” and lets make SuperFunTime light green. the command I ran was /holograms setline myfirsthologram 1 My favorite Minecraft server is &aSuperFunTime

To create a hologram with an image, go to your desired spot and create a blank hologram with /holograms create <hologramName> Then upload your desired image into the HolographicDisplays plugin folder. /holograms readimage <holographName> <image.png> <width> for me it was /holograms readimage diamond diamond.png 32 The diamond image I used is from here WARNING: I ran into a bug where /holograms reload will delete the hologram. I do not know why this happens.

Lets add a new line to our hologram that has some diamond icons. Here is some good documentation on how it works and other options. Lets add a diamond to the bottom of MyFirstHologram /holograms addline myfirsthologram ICON: diamond

Placeholders can be used to display dynamic content such as the players username, the number of players online, or the world name. Lets create a new hologram called username that displays their username and use a placeholder. This requires ProtocolLib. Enter /holograms create username {player} and a new hologram should show up with your username in it.
You can also apply formatting and color codes to it. Lets edit our username hologram /holograms edit username and select /holograms setline username To set the username to be dark aqua, enter /holograms setline username 1 &3{player}

This plugin has a few simple configuration files The config.yml allows you to change the symbols used for images, the time, as well as bungee related settings The database.yml file has a list of all of your holograms. You could change them in there but that is not recommended. symbols.yml is where you can store and use Unicode symbols. These are also known as static placeholders. The last thing is animations. You can create an animation by creating a file such as myanimation.txt, edit it (example), then reloading the plugin with /holograms reload and using /holograms addline myfirsthologram {animation: myanimation.txt} Colorful text Use /holograms reload after all configuration changes
I will create a small item shop with diamonds, gold, iron, and emeralds. You will need to use your own sign shop or chest shop plugin but that’s up to you. To have an Icon on top of the chests like in the pictures. To create an icon on a chest for gold. Get on top of the chest and type in /holograms create shopGold ICON: goldingot you can then do /holograms movehere shopGold to move it if needed.

To bring some attention to our shop, Lets put a diamond icon above the shop. I will use the diamond from the images section above. So I ran /holograms create shopIcon Then I made sure the diamond.png was uploaded. I went above the shop and entered /holograms readimage shopIcon diamond.png 32 and then it showed up.

There are other plugins such as Touchscreen Holograms that allow you to add commands to your holograms. There are many other plugins that use the HologrpahicDisplays API.
That’s everything you need to know about holographicdisplays! If you still need help contact us.
FREE game server, VPS, web host, dedicated IP & more on most plans!
Get Started