
In the age of the remote workforce and frequent travel your privacy on the internet is becoming more and more scarce. Social Media and other Geo-location tracking services as well as cell carriers, ISPs, and most dangerous of all hackers track your every move and action it is almost not


In the age of the remote workforce and frequent travel your privacy on the internet is becoming more and more scarce. Social Media and other Geo-location tracking services as well as cell carriers, ISPs, and most dangerous of all hackers track your every move and action it is almost not an option to have a Virtual Private Network service. You can host your very on VPN service using software such as SoftEther VPN. SoftEther stands for Software Ethernet. It is a fully Free and Open Source, multi-protocol / “Vendor Neutral” VPN server that is easy to install and use and it is sponsored and developed by the University of Tsukuba in Japan. Both the SoftEther VPN server and client are licensed under the permissive Apache Licence Version 2 allowing you to modify and distribute your own changes. SoftEther VPN can be configured to do something as simple as encrypting your internet connection on almost any device to creating an advance, highly configurable cloud router/switch and firewall with monitoring. Some VPN providers even use their own in-house modified versions of SoftEther VPN to operate their massive VPN networks with thousands of users. New versions of SoftEther VPN are very developer friendly by including a JSON-RPC API Suite with documentation that allows you to build your own server management solutions in many different programming languages.
This tutorial will focus on a quick and simple encrypted internet gateway setup. We will also set up the SoftEther VPN client on Windows, SSTP client on Windows, and I will go over connecting on Android with OpenVPN, SSTP, and L2TP/IPsec as well as setting up the GUI Admin tool on Windows and showing off some speed tests. If you do not plan to run a webserver on this VPS you can use port 443 to slip through tough, packet-inspecting firewalls and unfriendly ISPs (you can also change it to port 8080 or 8443 as well). You also may be thinking that HTTPS isn’t the fastest protocol and you are right! SoftEther VPN solves that problem by letting you set multiple simultaneous HTTPS TCP connections. SoftEther VPN works by using a protocol called Strong SSL-VPN which tricks your Firewall/ISP that you are just “browsing the web” with https. While this protocol works on the SoftEther VPN client for Windows and GNU/Linux it only works properly on Windows in my experience. SoftEther’s Ethernet over HTTPS works by creating a virtual network adapter as if you were physically connected to a virtual network switch with an ethernet cable on your VPS. While this does not matter much for the less-technical user it does provide advance functionality if needed such as full layer 2 networking support. SoftEther also contains fast “Clone-Servers” to allow OpenVPN, L2TP/IPsec, L2TPv3, and Microsoft SSTP clients to connect. If you are going somewhere that has a very strict firewall that doesn’t even allow regular TCP traffic (which is basically unheard of) SoftEther VPN comes with VPN over DNS/ICMP which is very overkill and can penetrate any firewall that has access to the internet. Also if you are running multiple Virtual Private Servers (even some non-ElixirNode VPS) and need to create an “AWS/Google Cloud-like virtual internal network” for secure VPS-to-VPS communication this is the program for you! You can also connect your home network appliances such as network storage and backup solutions using the SoftEther VPN Bridge. If you are interested in the source code you can find it on SoftEther VPN’s GitHub. If you want to read about SoftEther’s specification go here.

First things first. If you do not already have a VPS host, get VPS hosting here and choose to install Ubuntu 20.04. I would suggest a ElixirNode VPS hosting package of Budget-2 or Budget-3 at the minimum for the best experience especially if you plan to give access to a lot of friends and family but if your on a very tight budget our $2/mo Budget VPS-1 would be fine for less than 5 users performing minimal web browsing. If you want to run a web-server along with your VPN server I would suggest buying a second IP address to reduce compromise. I also suggest generating and using an SSH key for faster logins and enhanced security. Once your new VPS is installed run these commands to get it up to date with the latest security patches.sudo apt update && sudo apt upgrade -y
This may take awhile. Once done reboot your server withsudo shutdown -r +0
Once logged back in, run the first command again to make sure you are fully up to date. Then run sudo apt-get install build-essential -y If so, go in your web browser and go to http://www.softether-download.com/files/softether/ and scroll to the bottom. Click the latest one (above the web.config file) then go to Linux > SoftEther_VPN_Server Then right click on 64bit_-_Intel_x64_or_AMD64 and copy the link or link location. Back in your terminal, type wget [paste-url] do not include the brackets. For example my command is wget http://www.softether-download.com/files/softether/v4.34-9745-rtm-2020.04.05-tree/Linux/SoftEther_VPN_Server/64bit_-_Intel_x64_or_AMD64/softether-vpnserver-v4.34-9745-rtm-2020.04.05-linux-x64-64bit.tar.gz
After that is done downloading, run tar xzvf [Downloaded-Filename] without the brackets. Mine was tar xzvf softether-vpnserver-v4.34-9745-rtm-2020.04.05-linux-x64-64bit.tar.gz
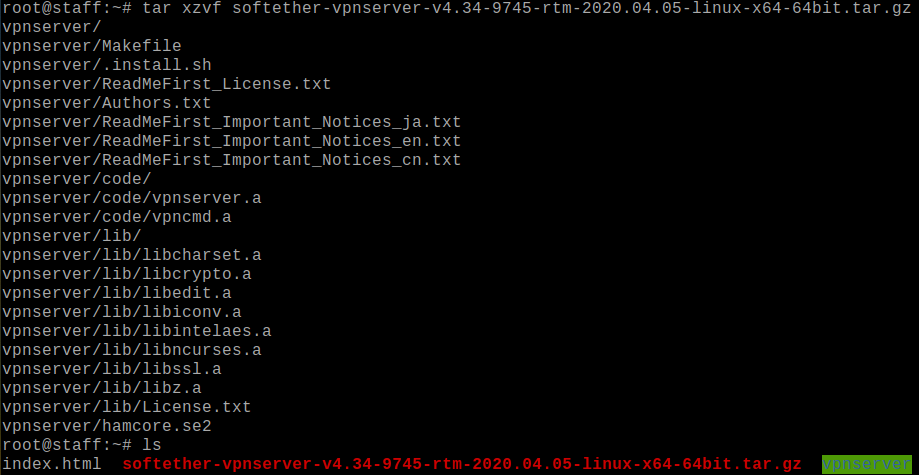
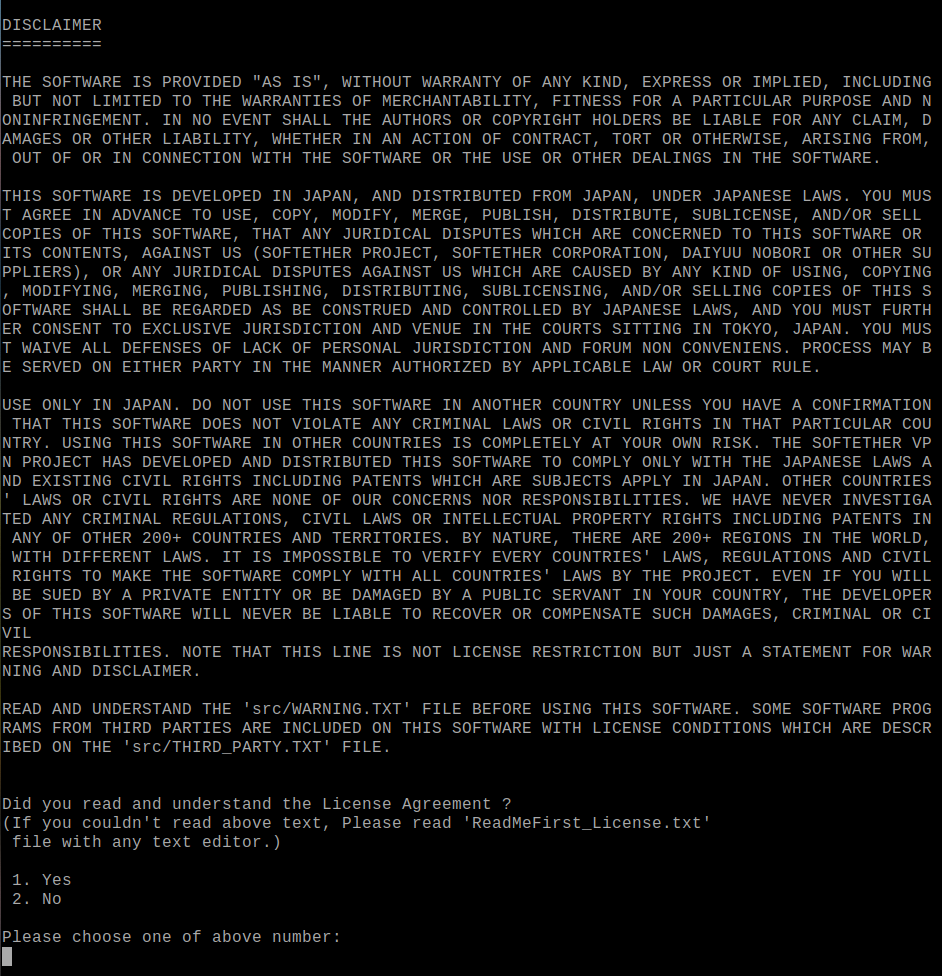
Now that the files are decompressed lets get to the software setup. Run cd vpnserver to go into the SoftEther VPN directory and run make Be sure to accept the disclaimer.
Once done run cd .. && mv vpnserver /usr/local then cd /usr/local/vpnserver/ Now lets fix the permissions. chmod 600 * chmod 700 vpnserver chmod 700 vpncmd
Lets now create a service. Enter nano /etc/init.d/vpnserver Insert this into the file
#!/bin/sh
# chkconfig: 2345 99 01
# description: SoftEther VPN Server
DAEMON=/usr/local/vpnserver/vpnserver
LOCK=/var/lock/subsys/vpnserver
test -x $DAEMON || exit 0
case "$1" in
start)
$DAEMON start
touch $LOCK
;;
stop)
$DAEMON stop
rm $LOCK
;;
restart)
$DAEMON stop
sleep 3
$DAEMON start
;;
*)
echo "Usage: $0 {start|stop|restart}"
exit 1
esac
exit 0
Once that is created. run mkdir /var/lock/subsys just in case your system does not have it. Then run chmod 755 /etc/init.d/vpnserver && /etc/init.d/vpnserver start and update-rc.d vpnserver defaults to make it a service.
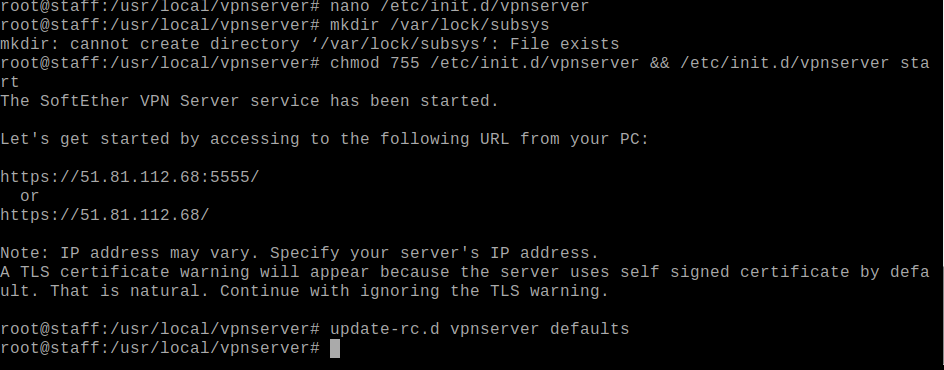
Run ./vpncmd in /usr/local/vpnserver then enter 1 and press enter twice. Then run ServerPasswordSet and set a password. Once the password is set run HubCreate myhub and set a secure password. Once you set them run Hub myhub to enter the hub.
To setup the VPN server for proper use on your VPS enable SecureNat to allow the hub to work as a virtual LAN run SecureNatEnable Once that is done run UserCreate username I set my username to andrew. Press enter for the rest of the options.

Now to set a password. run UserPasswordSet username then set the password.
Now to get Multi-Protocol working. The first thing to do is enable IPsec. Do that by running IPsecEnable enter yes for the first two options then create a key. The key can be anything simple it doesn’t really matter. Then set myhub as the default hub.
To get OpenVPN support, create a certificate. Run ServerCertRegenerate ip/domain replace ip/domain with the server’s IP address or domain name. Once that is done run ServerCertGet ~/cert.cer to install it. You can also now enable Microsoft’s SSTP by running SstpEnable yes You can then run OpenVpnEnable yes /PORTS:1194 to enable OpenVPN. You can also use the TCP ports to connect to OpenVPN. You can now run OpenVpnMakeConfig ~/openvpn_config.zip to create the openvpn configuration files. Run exit to get out of vpncmd.
Lastly, lets configure our firewall to allow L2TP/IPsec and udp OpenVPN connections. Run ufw allow 500/udp && ufw allow 4500/udp && ufw allow 1194/udp and thats it! You can use a SFTP/SCP client like winscp to download your OpenVPN configurations for OpenVPN clients. Use the remote_access_l3 OpenVPN file on your client devices.
This section will go over connecting to your VPN server using the different protocols. Note that you only need to use one of these protocols to connect to the VPN server and some may work better than others.
Lets setup SoftEther VPN client on Windows 10. go to https://www.softether-download.com/en.aspx?product=softether and download as follows. This is the best option since it allows you to use all of SoftEther VPN’s features without any compromise.
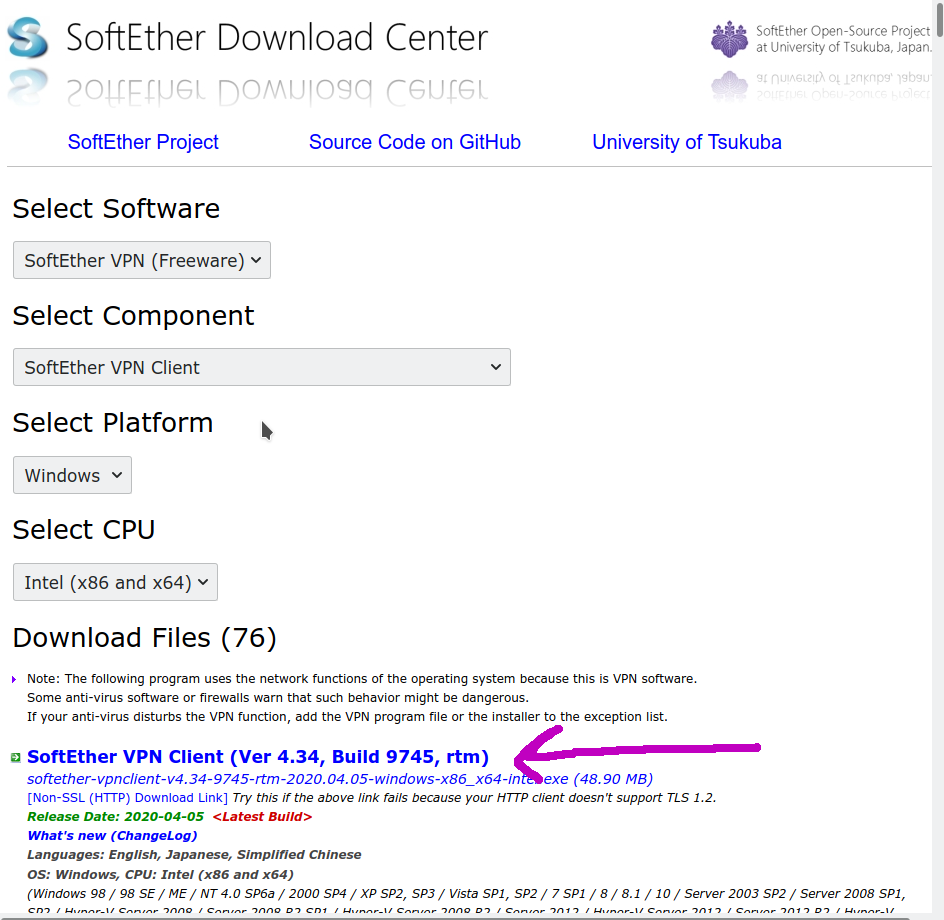
Once downloaded. Click the .exe file to begin installing. Go through the installation steps to install the software. Once installed, start the software
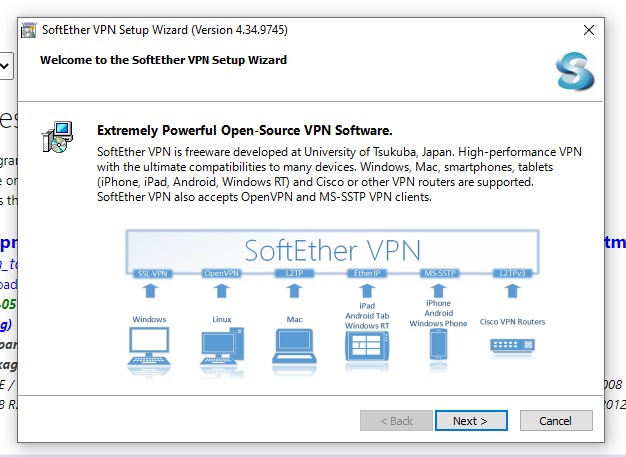
In the installer, select the top option (client) and accept the license agreement. Once installed start the client. In the client click Virtual Adpater > New Virtual Adapter in the top menu. You can just leave the default name and let Windows create the adapter. Next, select Add VPN Connection and then put in all of your servers info. Make sure you select the correct hub. Then click on advance settings and change number of TCP connections to 32, and click the two check boxes on the left to use Data Compression (if desired) as well as disabling UDP acceleration (If UDP causes issues). Click Ok in both menus to create the connection

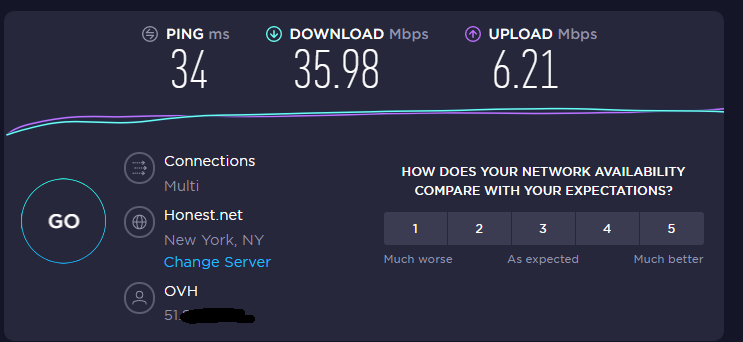
Once you are done, right click on the connection name in the menu and click connect. Once done you should see a success message and your local IP address on the virtual hub! Congratulations you are connected to your VPN! Here are my speedtest.net results. SoftEtherVPN is the type of VPN that speeds up as needed so don’t be discouraged if it’s slow at first. If you are on Linux you can use this tutorial to connect. But you are better off using OpenVPN or L2TP for non-windows operating systems.
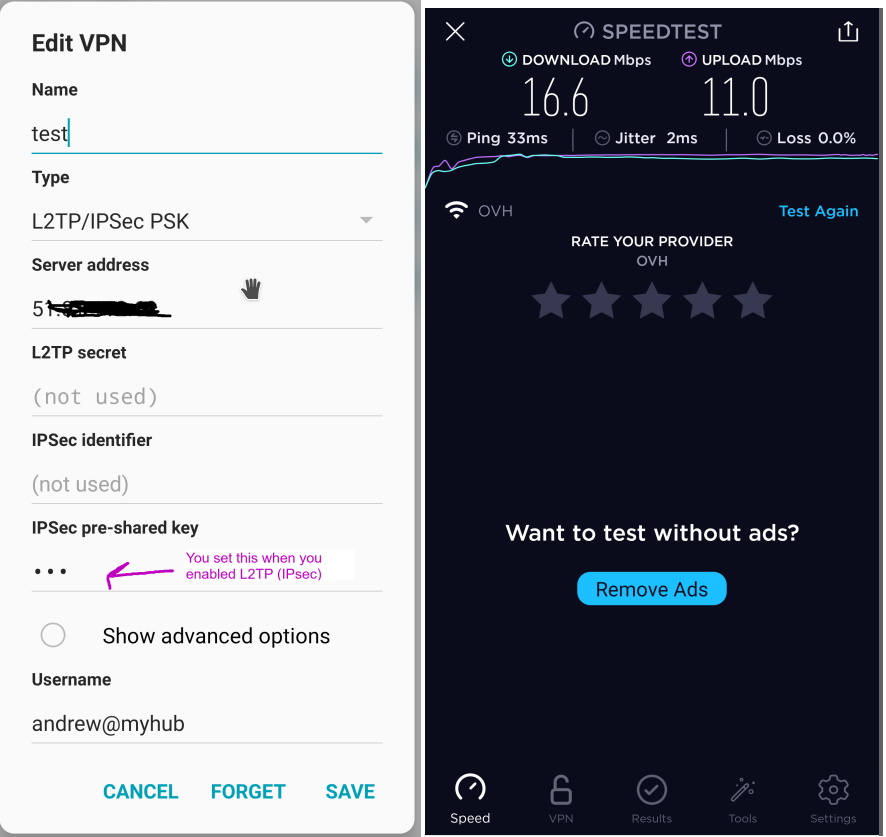
This is the setup on my Android Phone. L2TP/IPsec is not as fast as the OpenVPN protocol so use that if you can. But that requires additional setup. Using any UDP-based connection will vary in speed based on distance and latency and it will likely be blocked by firewalls. The only time I suggest using L2TP/IPsec is when you cannot install VPN software on that device and do not have administrator access such as on a school or office owned computer or device.
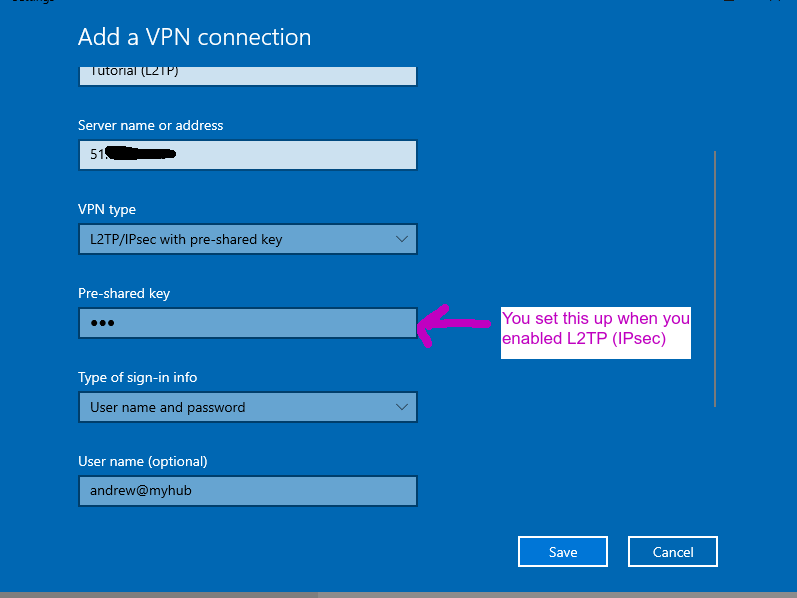
L2TP/IPsec on Windows 10 is just as simple! just go to settings > Network and Internet > VPN and click Add a VPN connection and select L2TP/IPsec with pre-shared key as VPN type.
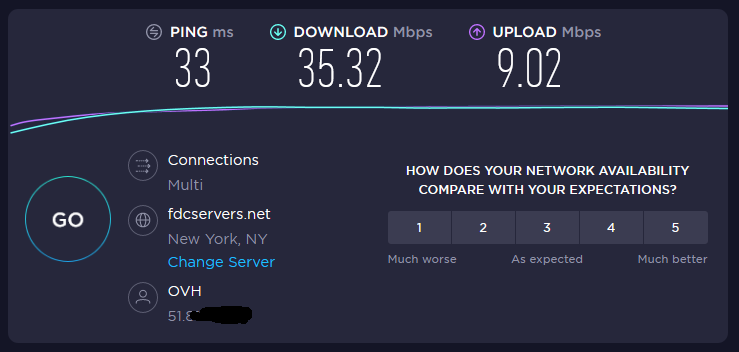
If you need to use an IOS device on your VPN you can use the built in L2TP client and get very fast speeds. I cannot show you how to do it myself or perform a speedtest since I do not own an IOS device. But here is a good tutorial
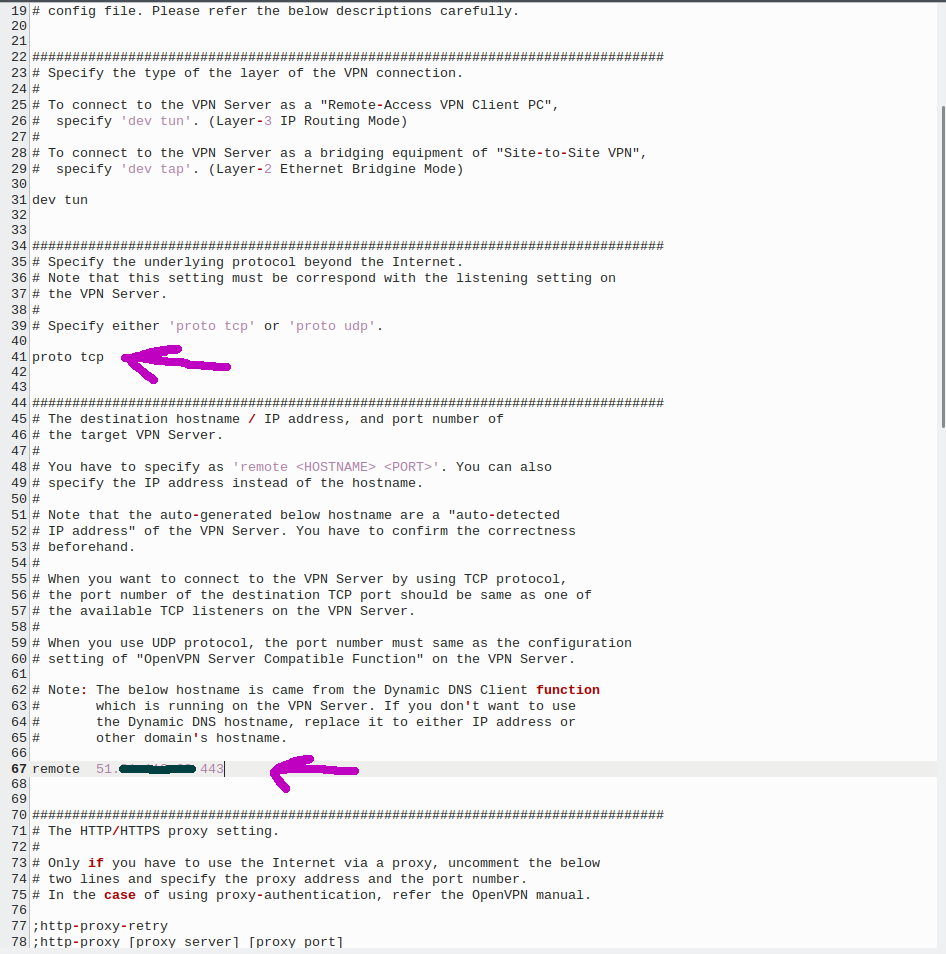
To bypass firewalls on mobile, download OpenVPN connect from the app store and download the OpenVPN client l3 profile from your server and edit it to use TCP and port 443 as seen in this image. Then email this profile to your device.
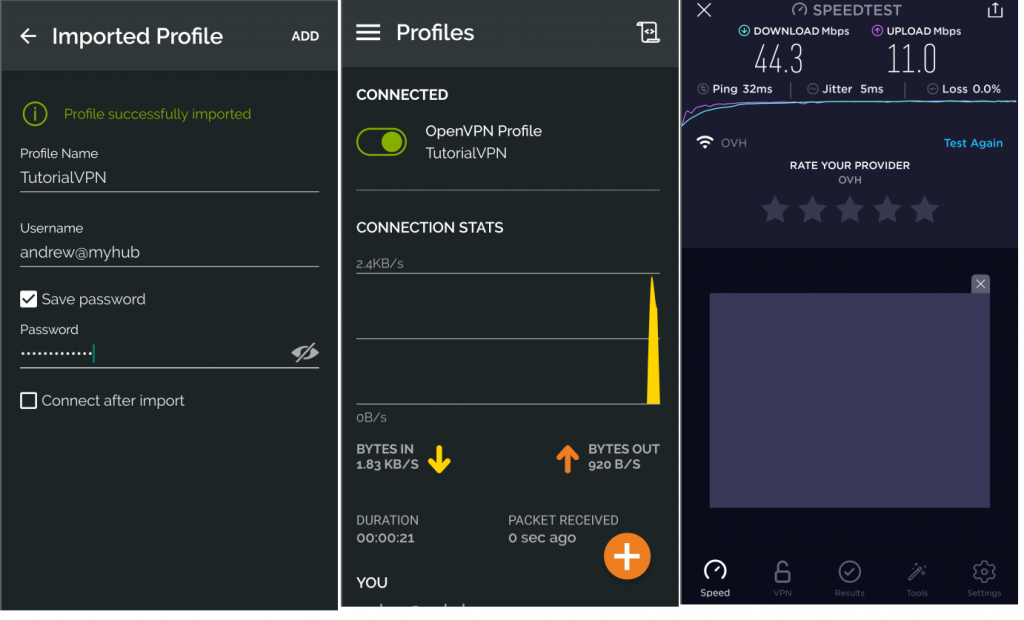
Once you email it, download the edited OpenVPN profile to your device. Open the OpenVPN connect app. Tap on File and select the downloaded profile from the list of downloads. Rename it to something simple and save your password if you’d like. If you connect and you get a certificate error, just continue and you should connect fine.
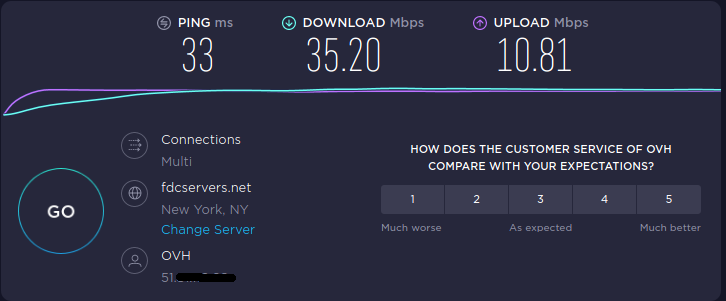
Lastly, here is Microsoft SSTP on Windows 10. Please note this requires you to have port 443 available and enabled. Go to settings > Network and Internet > VPN and click Add a VPN connection and select Secure Socket Tunneling Protocol (SSTP) as the VPN type.
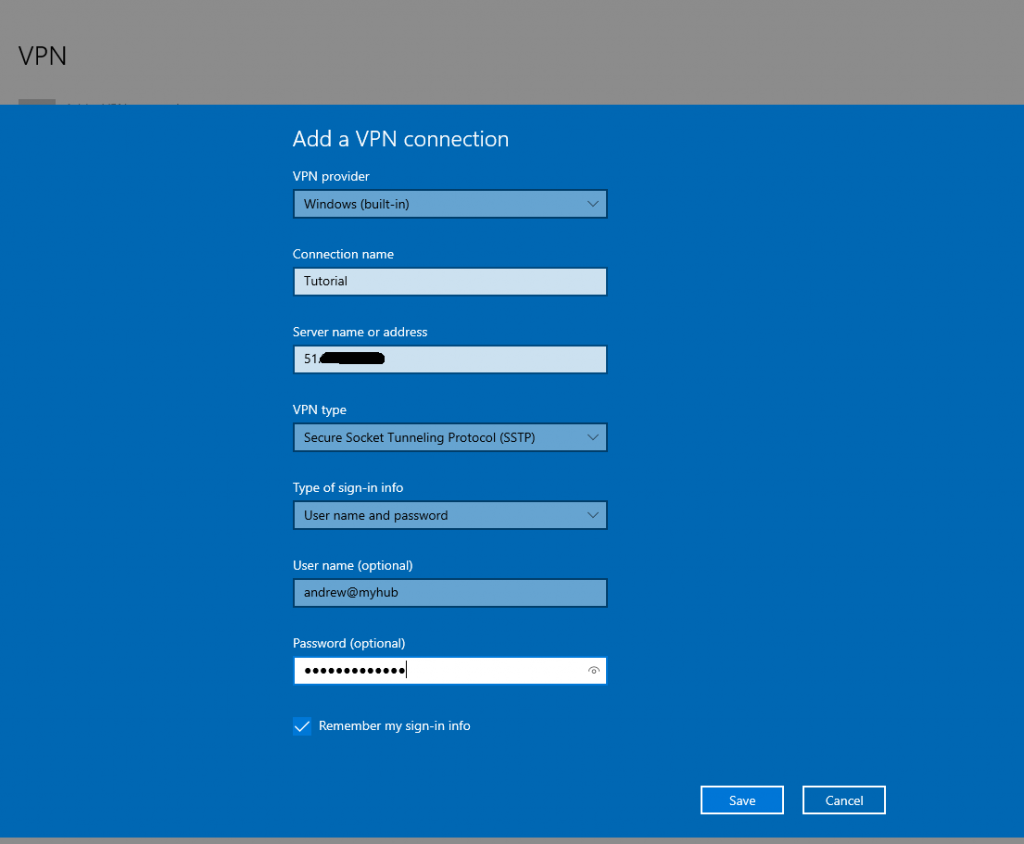
That will likely fail when you try to connect. If so you will need to download the cert.cer file from the server through SCP (its in the home directory) and install the certificate to the system by double clicking the cert.cer file , click on install certificate then click Local Machine click Place all certificates in the following store then click Browse and in that window click Trusted Root Certification Authorities and Ok then click Next and Finish and that’s how you install an SSL certificate on windows. Please note you will need administrator privileges to do this!
Now you should connect fine! This protocol can be the fastest if you have a high bandwidth internet connection and a fast Windows PC. SSTP is a lot like the SoftEther protocol on the surface. This option is the best if you have a personal work computer with administrative access but are not allowed to install any third party software (or you’re using Windows 10 in S mode) and need to use SSL-VPN over port 443.
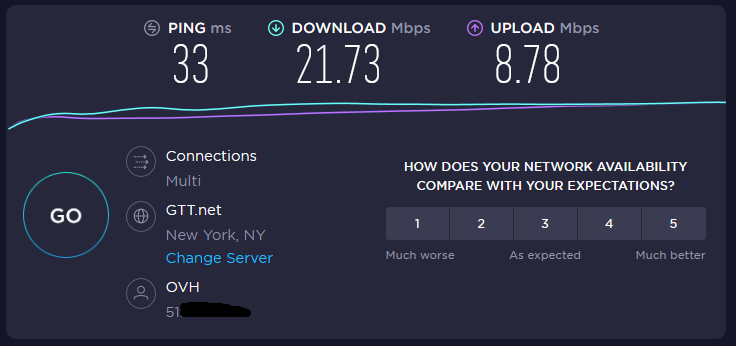
L2TP/IPsec and SSTP were also tested on Ubuntu 20.04 GNU/Linux and the L2TP/IPsec test came out very similar to the windows Virtual Machine where Ubuntu only came out a little faster but SSTP was a much different case with more than double the download speed and max upload speed on Ubuntu. This is likely due to the virtualization overhead that’s in my Windows 10 testing environment not being present.
If you are an Android user you can also use SSTP via the Open-SSTP-Client app. On their GitHub on your mobile device download and install the APK then email/send your cert.cer file to your device and open it on your device to import it once you import it you can open the app, put in your username and password and connect. Just be sure to go to the setting tab and check Disable Hostname Verifier box then tap save. On the home tab, put in the server domain or IP as the host then enter your username and password and tap the little toggle switch on the left side of your screen. Please note that this app is still in beta and you may (will) experience slow speeds and data loss.
Let’s setup the VPN server manager for an easy to use GUI for administering the VPN server. This works on Windows 10 and on GNU/Linux and OSX via Wine.
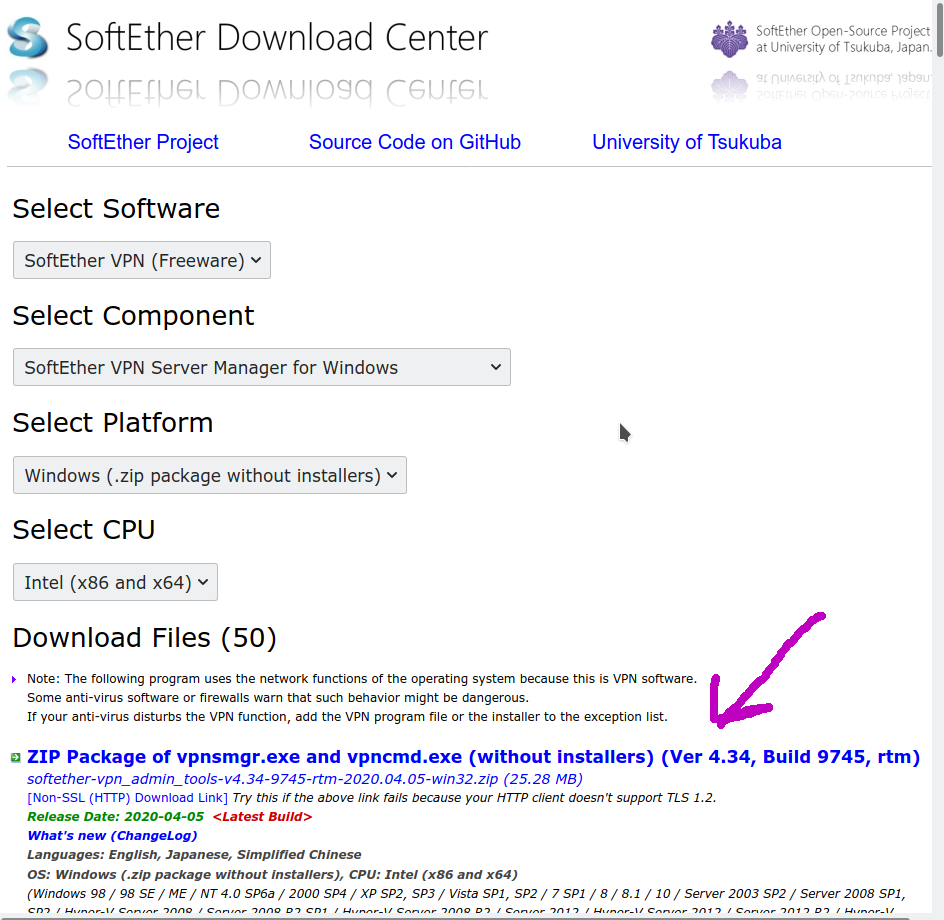
Once downloaded. Unzip the files to your desktop (or wherever you’d like) and run the vpnsmgr program. Once extracted go to the folder and click on the vpnsmgr program. Click on New Setting in that menu enter your server information then click ok.
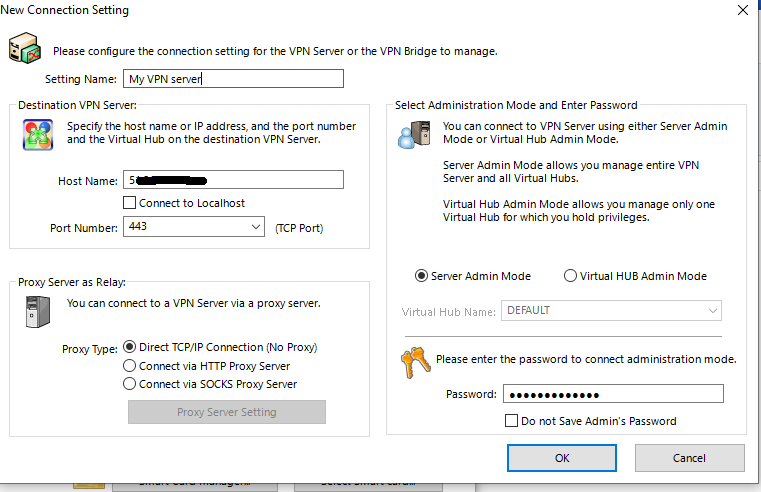
Click Connect on the selected server. From there you should log in. If you get anything about the L2TP setup just accept the defaults. From here you can configure anything from ports, hubs, users, etc. You can also get your static DNS name from this in the bottom left.
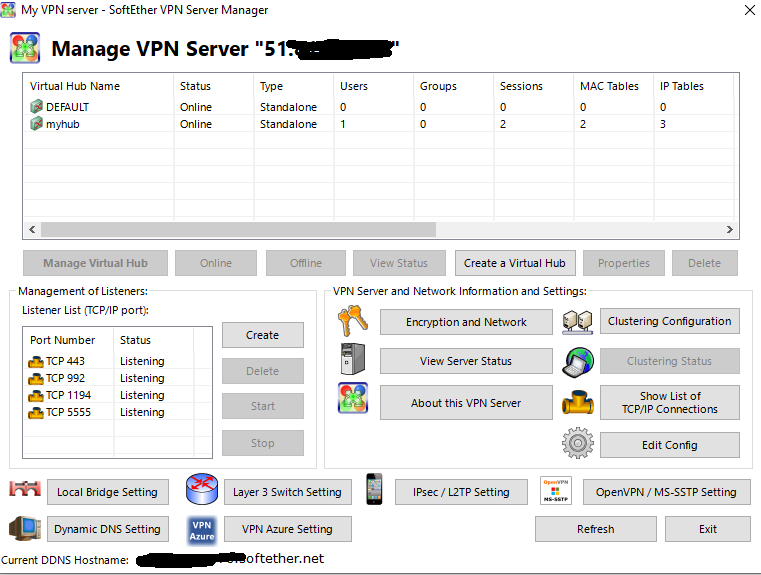
You now have a fully working, multi-protocol VPN server to secure your data anywhere you go. Happy surfing! In the future, you can install custom DNS servers like PiHole, custom DHCP servers and more! The only limit is your imagination. I may update or add to this tutorial in the future. For example adding IPv6 support, installing PiHole for Ad-blocking, and setting up a Linux DHCP/DHCPv6 server for more control over your virtual network. I may also do a tutorial on setting up a proxy server like squid to make your internet even faster, more secure, and controllable.
If you have any further questions or still need help, contact us.