A proxy server is a server that allows you to connect to services using a different IP address. Proxy servers are very easy to configure but can be very extendable. This tutorial will look at three different proxy servers that can run on your ElixirNode VPS. Those are Squid, for
A proxy server is a server that allows you to connect to services using a different IP address. Proxy servers are very easy to configure but can be very extendable. This tutorial will look at three different proxy servers that can run on your ElixirNode VPS. Those are Squid, for HTTP, HTTPS, and FTP proxing and caching, Basic SOCKS5 (over SSH), and ShadowSOCKS for proxing multiple protocols. We will also install php-proxy so you can just run a website with a limited proxy on it.
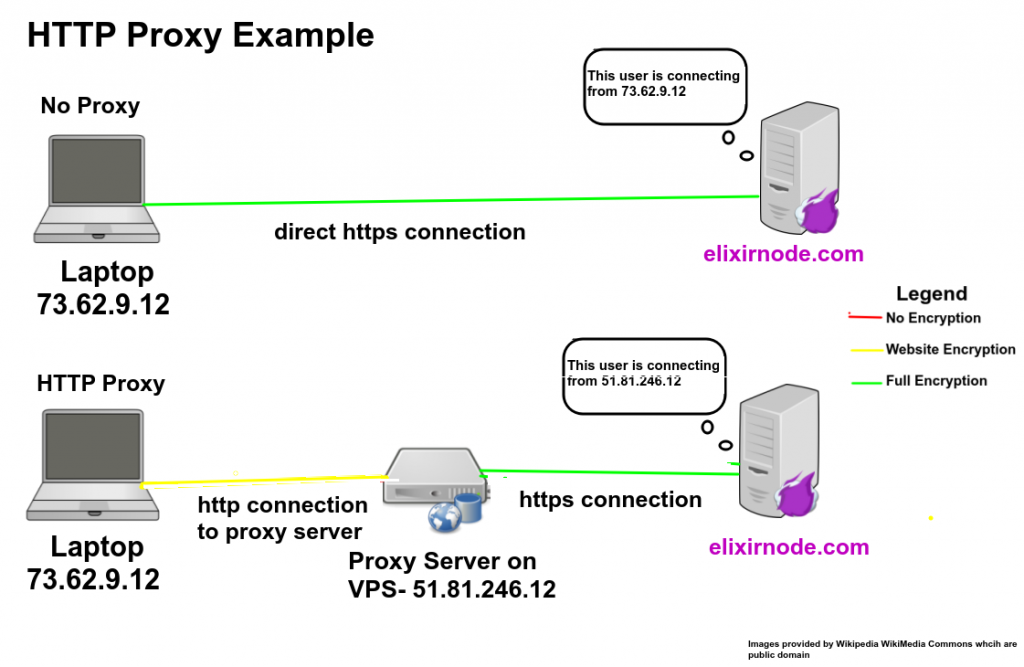
You may be wondering how this is different than a VPN and my answer to that is a little technical but hear me out. There is something called the Open Systems Interconnect Model or OSI Model for short. The OSI Model is split into seven different layers. The first layer being the physical layer which can be represented by Ethernet hubs and Ethernet cables, The second layer being the Data-Link layer is where your Ethernet/WiFi card can communicate with other Layer 2 devices such as other computers and network switches and uses MAC addresses, Layer 3 is the Network layer which operates using the Internet Protocol Address aka IP Address and is the top of the Media Layers section of the OSI model. Layer 4 is the transport layer which is what decides the protocol to use such as TCP, UDP, etc.. Layer 5 is the session layer and it manages the connection to and from the hosts. Layer 6 is the presentation layer which performs things such as encryption and data representation, Last but not least is Layer 7 which is the application layer which you can see as HTTP, HTTPS, FTP, GRE, etc.. VPNs usually run on the application (Layer 7) or presentation layer (Layer 6) but they emulate Layer 2 and/or Layer 3 protocols (a good example is SoftEther VPN). Proxies like Squid do not have any form of network emulation so they just operate on behalf of an application which operates on Layer 7. SOCKS5 is different in the way that it acts like a Layer 5 emulator being able to work with almost any protocol as well as TCP and UDP. This article will go over how to set up three (and a half) different proxy servers along side each other on your Budget ElixirNode VPS. The first being an HTTP(S)/FTP proxy aka Squid, then ShadowSOCKS, a plain and simple SOCKS5+SSH Proxy, and lastly the in browser php-proxy server.
Another question you may have is “why would I want to host in the cloud when I can host at home for free?!”. It really depends on your situation such as your internet speeds, data cap, security and privacy needs, and whether or not you have a spare computer to run the server software. Most home internet plans come with a cap around 1000GB/Mo and while that may sound like a lot you need to take into consideration who you live with and basically double your current use if you plan to implement. For example, if you use 400 GB/Mo on average like my family, then you should expect your usage to be closer to 800 GB/Mo after setting up your proxy. Also, most people have speeds around 150 Mbps download and around 12 Upload on average. I was lucky and got 1000 Mbps down and 40 Upload but my devices can only get around 150 Mbps down and 40 upload. Your Proxy or VPN server will only be as fast as your slowest speed. So if you have a 150/12 Mbps your proxy will only be 12 Mbps. You will also need an extra PC running GNU/Linux on 24/7 running the software and if you do not have an old low-power laptop or thin client desktop the electricity cost may be more than even our Budget-2 VPS hosting ($4/Mo). ElixirNode VPSes on the other hand have an average speed of 85 Mbps down and 85 Mbps up so you should get really good speeds. Also we are the best vps hosting providers for hosing proxies and VPNs since we include vps hosting unlimited bandwidth if needed. Another reason why we are the best is because we are the cheapest VPS hosting that has dedicated IPv4s and use KVM. Security is another issue. Most homes have firewalls that will either block incoming requests by default such as when you want to connect to your home hosted proxy server from somewhere else. Also most home networks have dynamic IPs and no DDoS protection which just makes it harder to manage and keep safe. ElixirNode has vps hosting with DDoS protection for everyone as well as 100% static IPs so you do not have to worry about security. Also, unlike Google and Amazon. ElixirNode is not interested in collecting, viewing, or selling your data making us perfect for privacy. All of these things combined are very important when it comes to vps for hosting proxies!
NOTE: I will assume you are running a SoftEther VPN server with PiHole along side the Proxy servers to eventually create an “All in One” online privacy solution in the cloud on our vps hosting service.
Squid, also known as Squid-Cache is a free and open source proxy server used by individuals and enterprises alike. Squid has been around for many, many years and can be used as a proxy server, load balancer, caching CDN, and reverse proxy. By installing this on your VPS, especially if you run a VPN server on it, you can benefit from saved bandwidth, faster speeds, site access control, multiple user authentication, and more. Since Squid is just a HTTP(S) and FTP proxy you can only use the proxy in your web browser or FTP client. If you set up Squid properly, it can be an easy way to access blocked sites on almost any device/web browser even on devices that are heavily locked down like school computers. It can also be an easy way (if you are a GNU/Linux user) to get software updates even in places that may block package manager hosts without having to install and configure third party programs. You can use your HTTP(S) or FTP proxy on just about any application that uses those protocols.
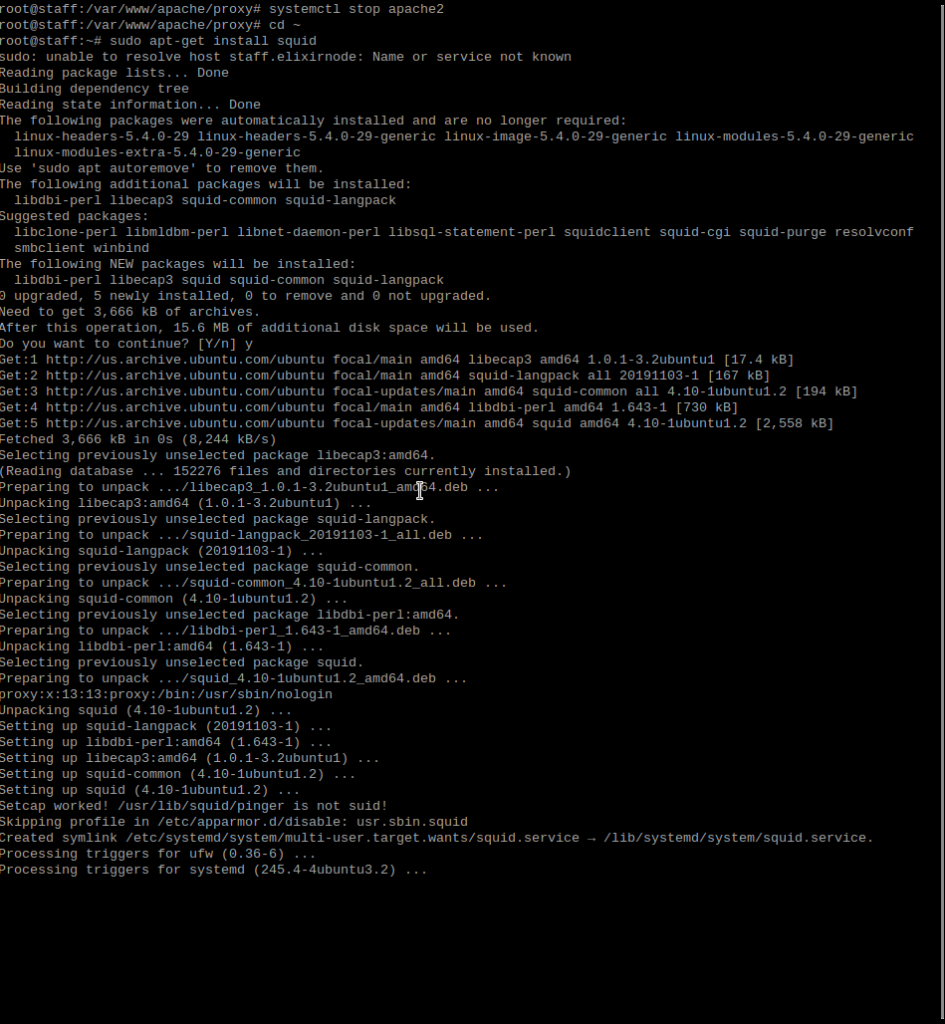
Let’s set it up! The first thing you need to do is log into your VPS using your favorite SSH client. If you have a password then enter it if you use an SSH key then great! On Ubuntu run sudo apt-get update to ensure you get the most up-to-date version of Squid in the repository. Installing Squid is as easy as running sudo apt install squid apache2-utils -y
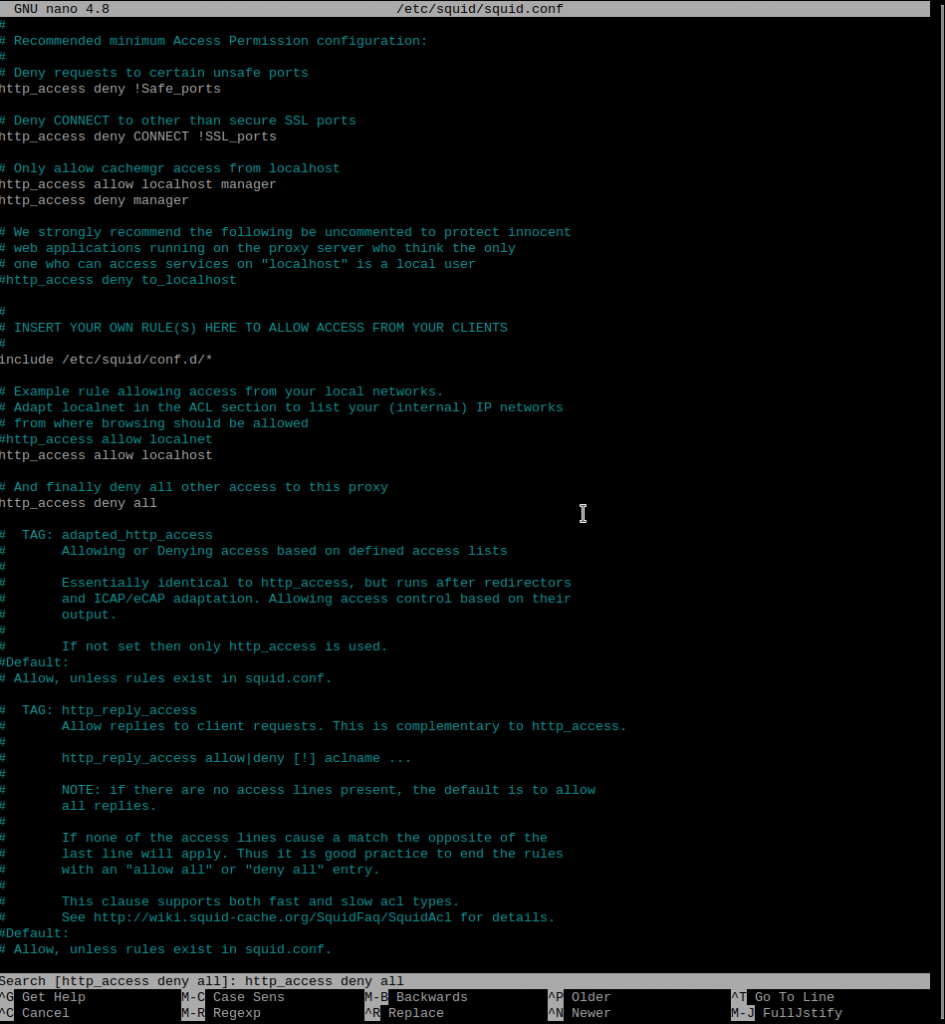
Once that is done, edit /etc/squid/squid.conf with your favorite text editor. For ease of use, I use nano so open the file by running sudo nano /etc/squid/squid.conf and pressing ctrl+w to search for http_port 3128 and change the 3128 to 8080. Port 8080 is often unblocked everywhere you go so its a top choice. If you want to be even more transparent you can use port 80 but be aware that you need to change your web server’s port if you are running one. There is a lot of information about features in Squid in this file so be sure to read some of it. Now we need to Press Ctrl+w again and search for http_access deny all and change it to http_access allow all to allow http traffic to get out. You can now save the file and exit by pressing ctrl+o to save and ctrl+x to exit.
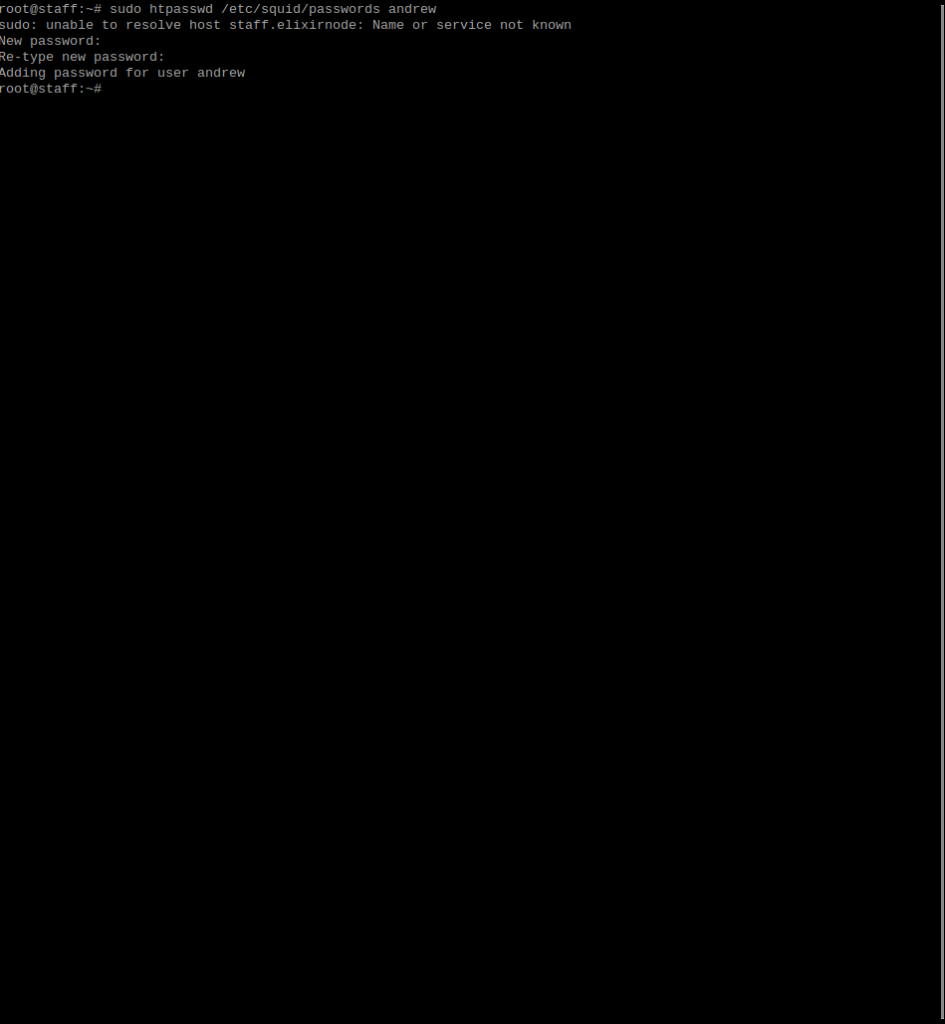
To keep the proxy safe from unwanted users, we are going to enable authentication using usernames and passwords! Squid uses Apache’s htpasswd system so lets iuse it! First, create a file by running sudo touch /etc/squid/passwords && sudo chown proxy: /etc/squid/passwords First, if you want to generate a strong username and/or password run this command on your server date +%s | sha256sum | base64 | head -c 32 ; echo and copy the output. You can now run sudo htpasswd /etc/squid/passwords newuser and enter or paste your password. for me it was sudo htpasswd /etc/squid/passwords andrew BE AWARE, THIS PASSWORD WILL NOT BE ENCRYPTED OVER THE NETWORK AND IS ONLY USED AS A DETERRENT SO USE A LONG PASSWORD THAT YOU WILL NOT USE FOR ANYTHING ELSE!
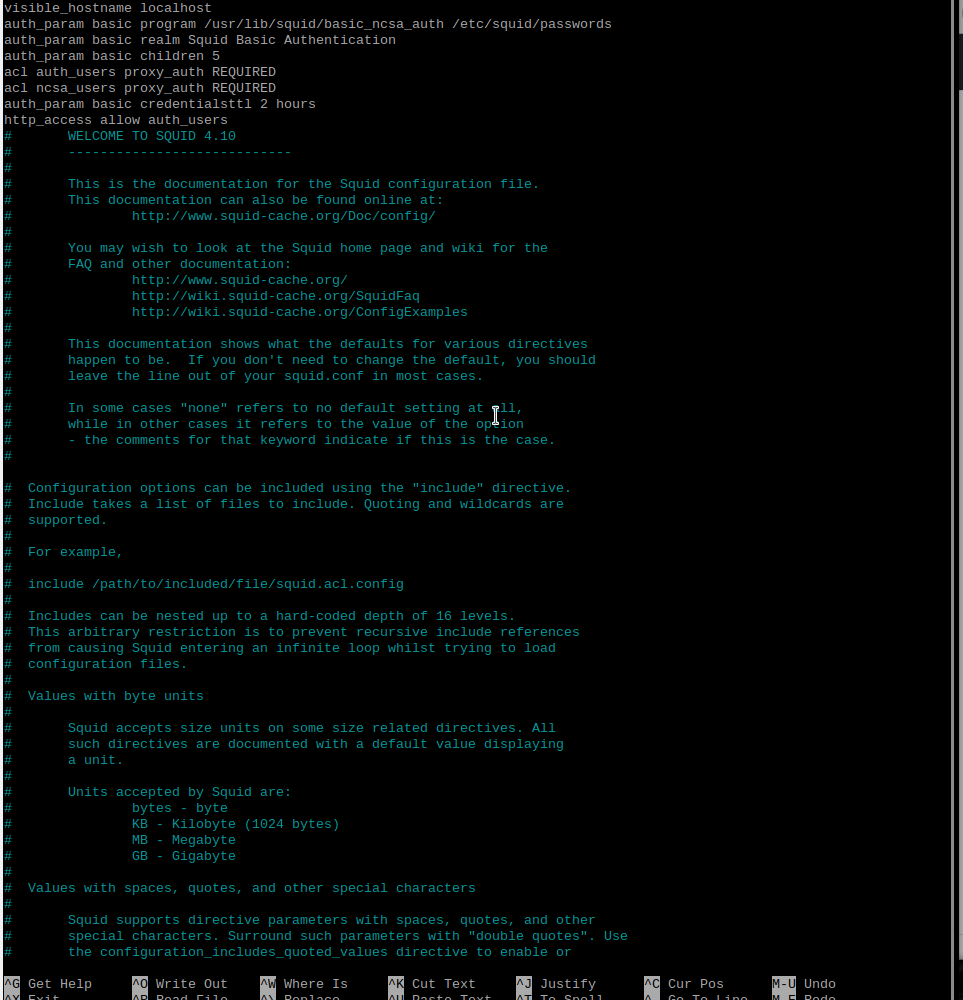
Return to the /etc/squid/squid.conf by editing it with your favorite text editor. For example by running sudo nano /etc/squid/squid.conf and insert the following on the top of the file-visible_hostname localhost #you can also set this to your FQDN if you have one auth_param basic program /usr/lib/squid/basic_ncsa_auth /etc/squid/passwords
auth_param basic realm Squid Basic Authentication
auth_param basic children 5acl ncsa_users proxy_auth REQUIRED
acl auth_users proxy_auth REQUIRED
auth_param basic credentialsttl 2 hours
http_access allow auth_users
After that press ctrl+o to save and ctrl+x to exit. Once out, run systemctl restart squid to restart squid.
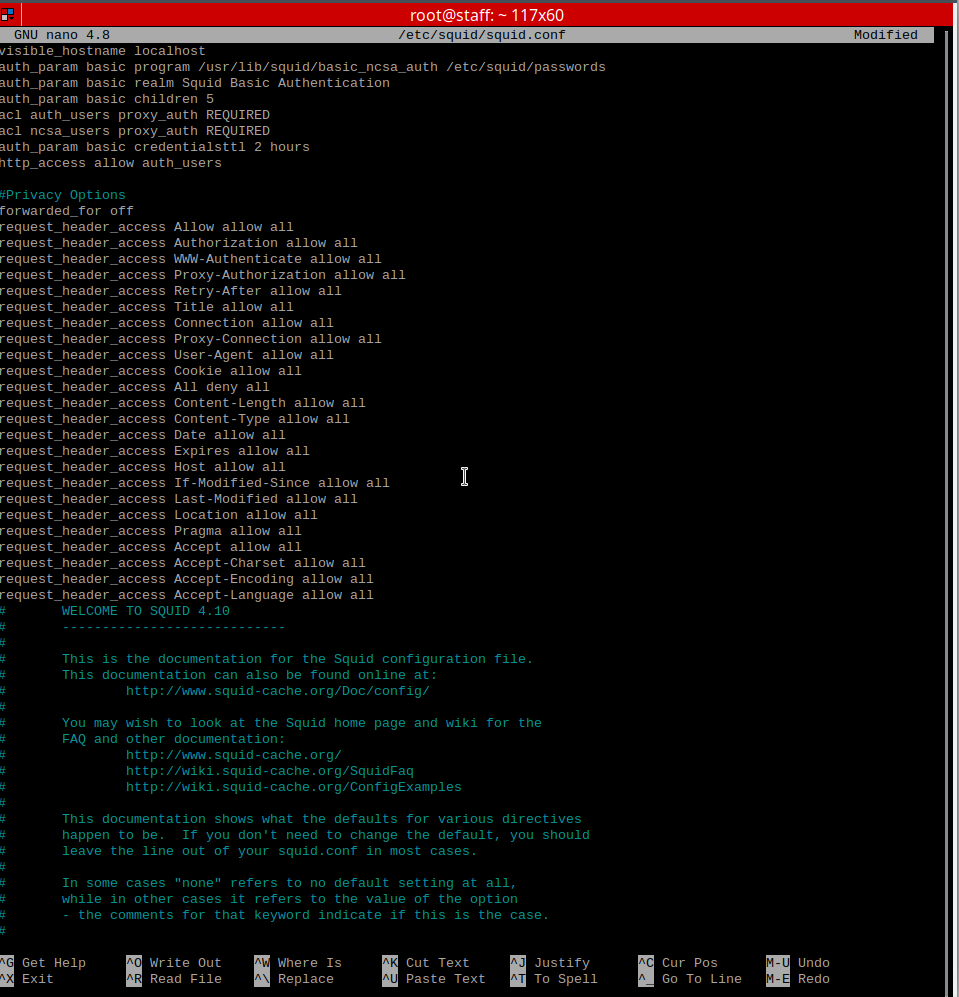
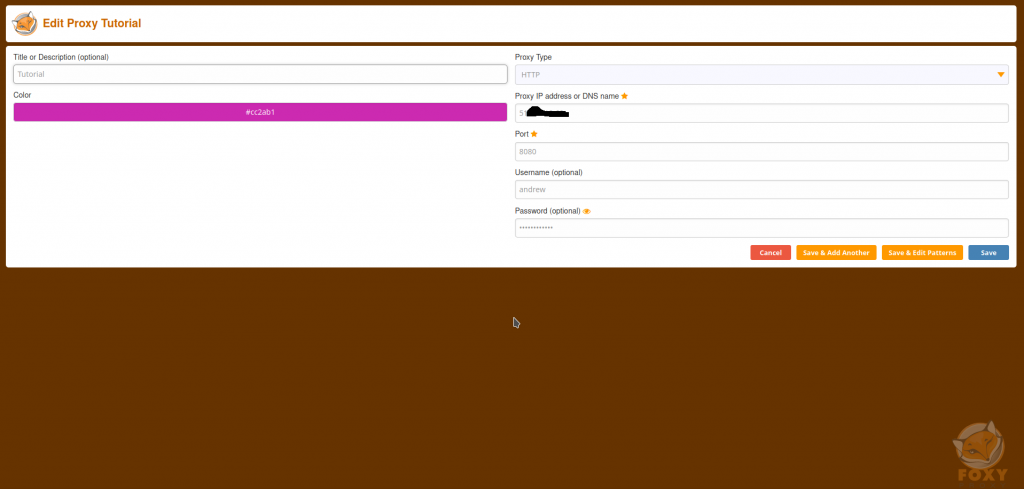
If you’d like to browse more anonymously, You can enable this list of settings here. You can do things such as block location access, user agent access, and even choose to accept the cookies! This was found in an old configuration file so I hope that all of these still work on the modern internet. Also, I suggest the FoxyProxy plugin on all browsers. Here is a link for FireFox and Chrome
request_header_access Proxy-Authenticate allow all
request_header_access Cache-Control allow all
request_header_access Content-Encoding allow all
request_header_access Content-Language allow all
request_header_access Mime-Version allow all
forwarded_for off
request_header_access Allow allow all
request_header_access Authorization allow all
request_header_access WWW-Authenticate allow all
request_header_access Proxy-Authorization allow all
request_header_access Retry-After allow all
request_header_access Title allow all
request_header_access Connection allow all
request_header_access Proxy-Connection allow all
request_header_access User-Agent allow all
request_header_access Cookie allow all
request_header_access All deny all
request_header_access Content-Length allow all
request_header_access Content-Type allow all
request_header_access Date allow all
request_header_access Expires allow all
request_header_access Host allow all
request_header_access If-Modified-Since allow all
request_header_access Last-Modified allow all
request_header_access Location allow all
request_header_access Pragma allow all
request_header_access Accept allow all
request_header_access Accept-Charset allow all
request_header_access Accept-Encoding allow all
request_header_access Accept-Language allow all
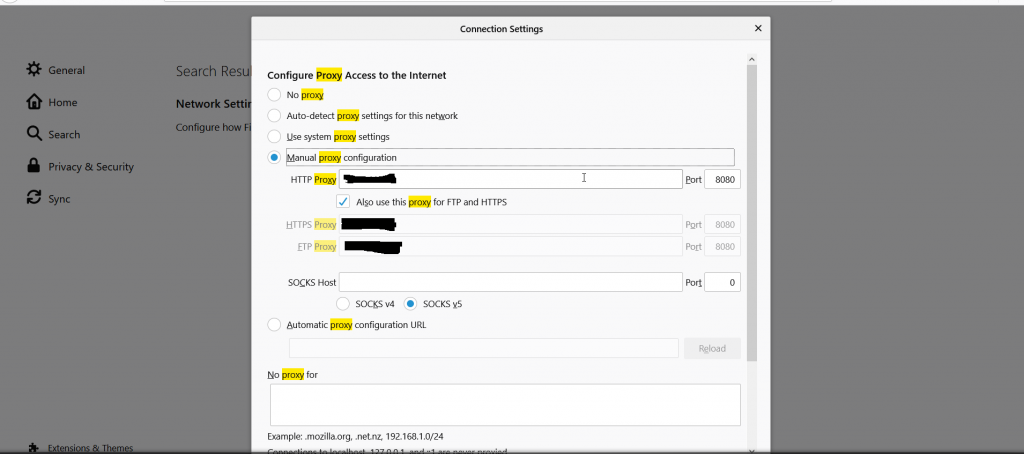
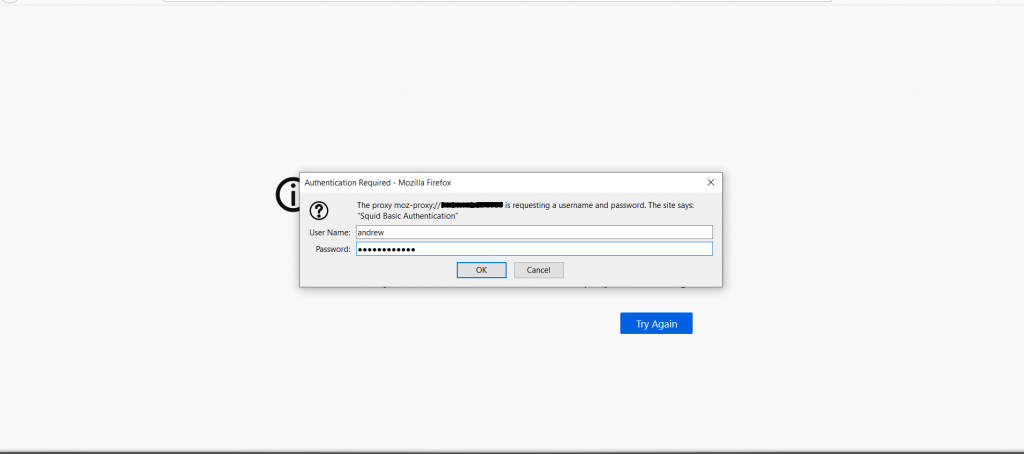
Now lets connect to squid http proxy, I use Firefox 82, which is one of the browsers that proxy settings built in. Click on the menu on the top right, click Preferences, Scroll to the bottom of general and click on Settings button in Network Settings area. From there you will enter your proxy info such as the ip of your VPS and port. Click the “Also use this proxy for https and ftp” button. Finally, save the settings then try to go to a new website or reload the one you are currently in. You should see a credentials box appear. Use the same username and password you set with htpasswd command.
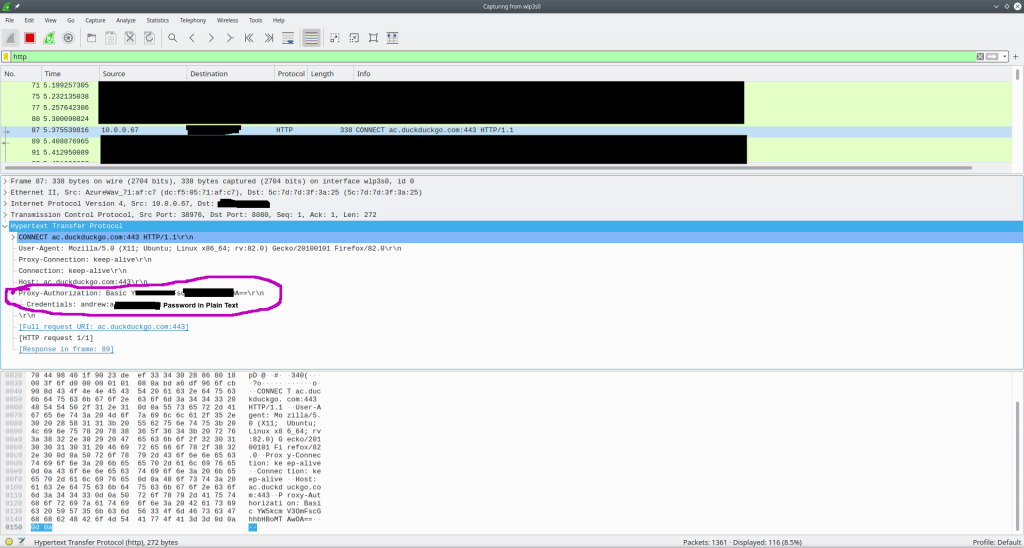
NOTE: While your password and proxy info will NOT be encrypted and will be sent over plain-text, HTTPS sites will still be safe for you. Also when it comes to speeds, expect around 65-80 Mbps for download and 50+ Mbps for Upload if your upload speeds are faster.
Just to show that HTTP proxies work on just about any device you can think of, here is my Nintendo 3DS connected to the proxy on my budget VPS. You can set this up (no hacks required) via the 3DS internet settings in the system settings. IPv6 was also tested but not shown.

You can also use the HTTP Proxy to connect to your VPN server if you are using SoftEther VPN, OpenVPN, or SSTP and having problems connecting to the server using a direct TCP/IP connection.
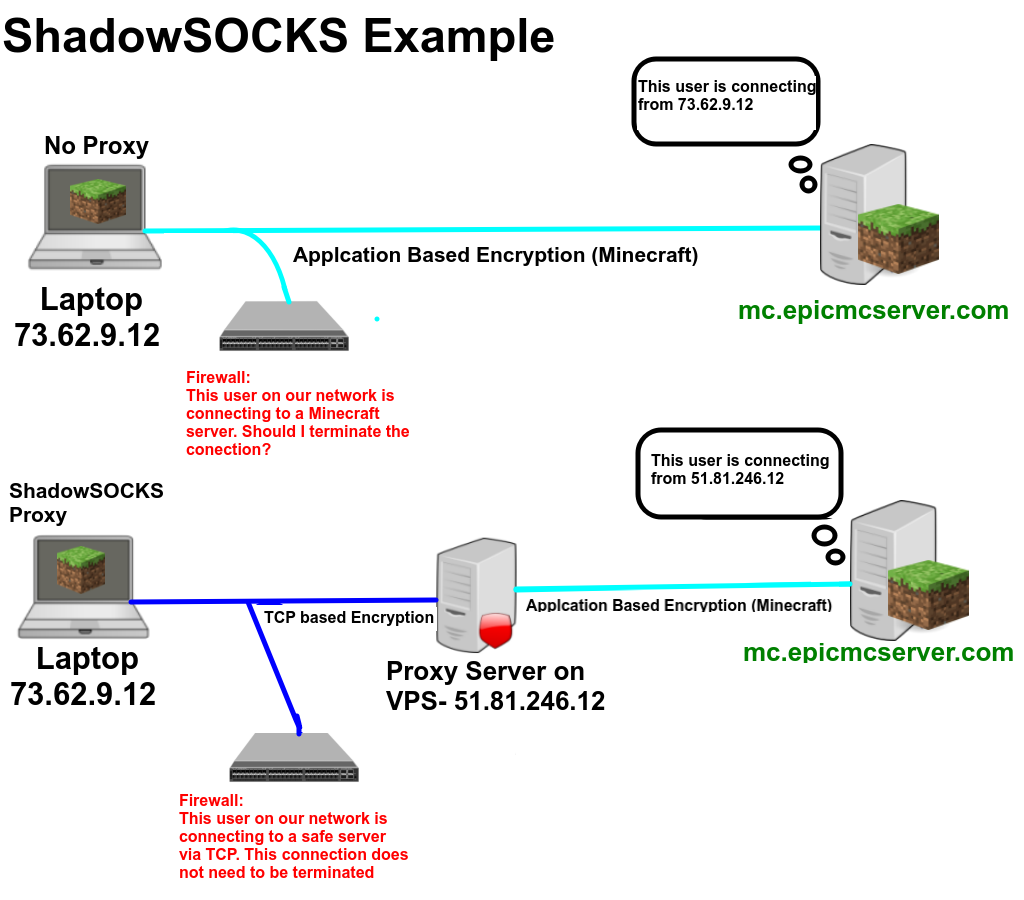
ShadowSOCKS falls in between a VPN and a Proxy. Essentially, ShadowSOCKS relies on special server and client software. The major benefit of ShadowSOCKS over http, ftp, and non-ssh based SOCKS5 connections is encryption and cross-platform support. There is also a popular “VPN” app called Outline that uses the ShadowSOCKS server and works very well. On devices such as iOS and Android phones ShadowSOCKS client runs as a VPN and you can proxy just about any app through it. This guide will use the modern shadowsocks-libev snap package for easier updating and management.
First thing’s first, run sudo apt update && apt upgrade -y to make sure you are all up to date.
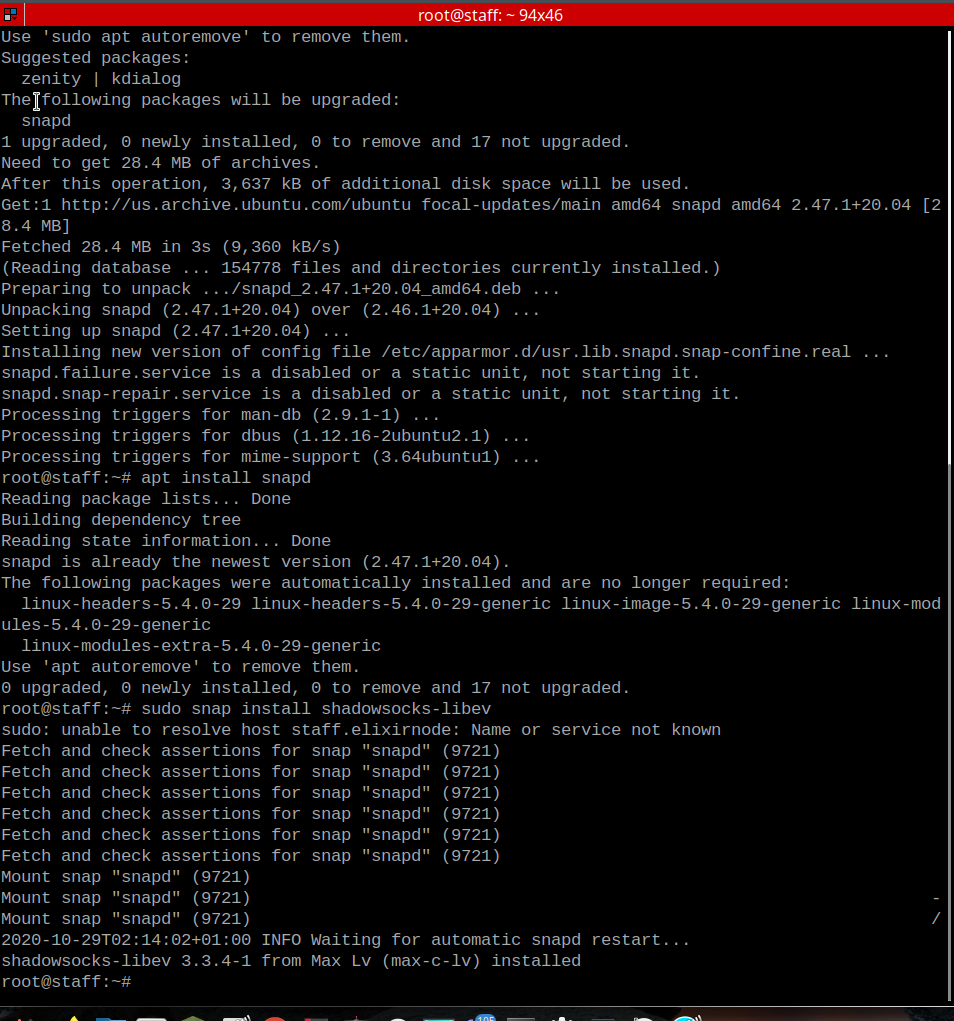
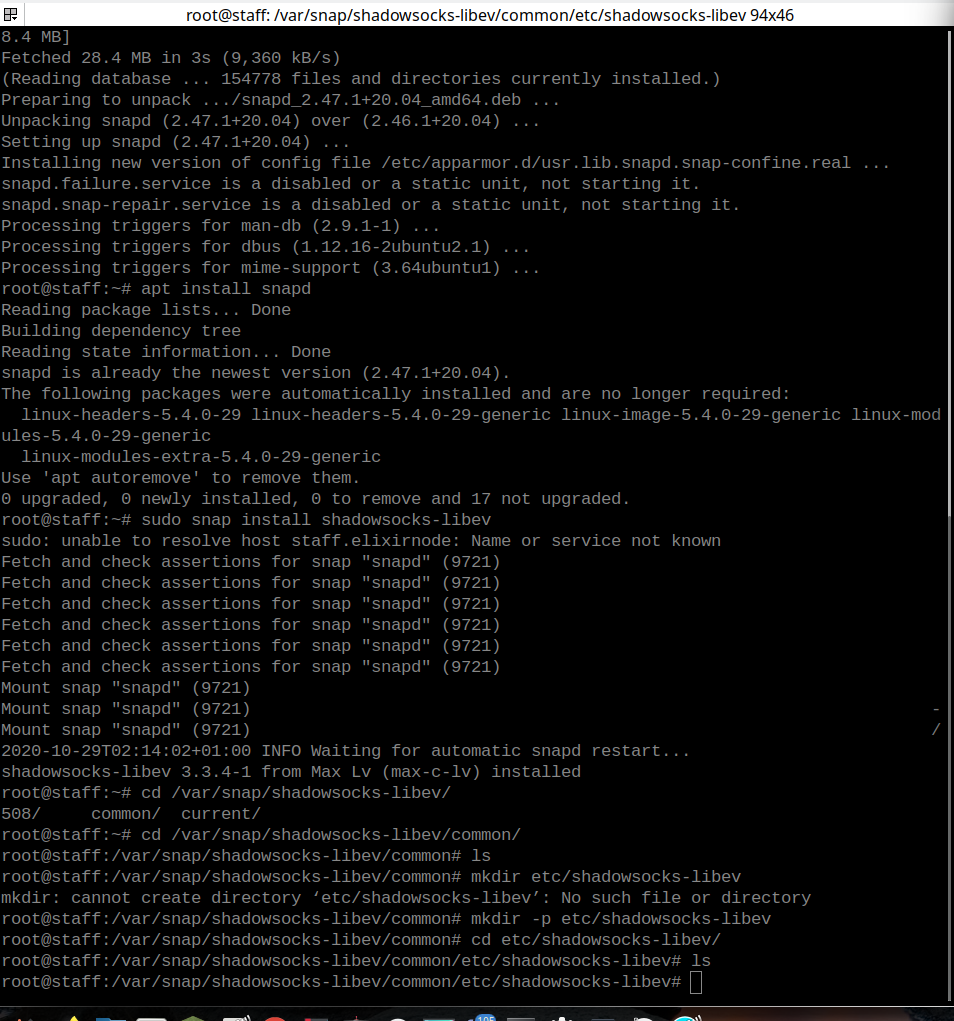
Then run sudo apt install -y snapd to install snap. Once that is done, run sudo snap install shadowsocks-libev Next run cd /var/snap/shadowsocks-libev/common so we can create some configuration files. Run mkdir -p etc/shadowsocks-libev then run cd etc/shadowsocks-libev/
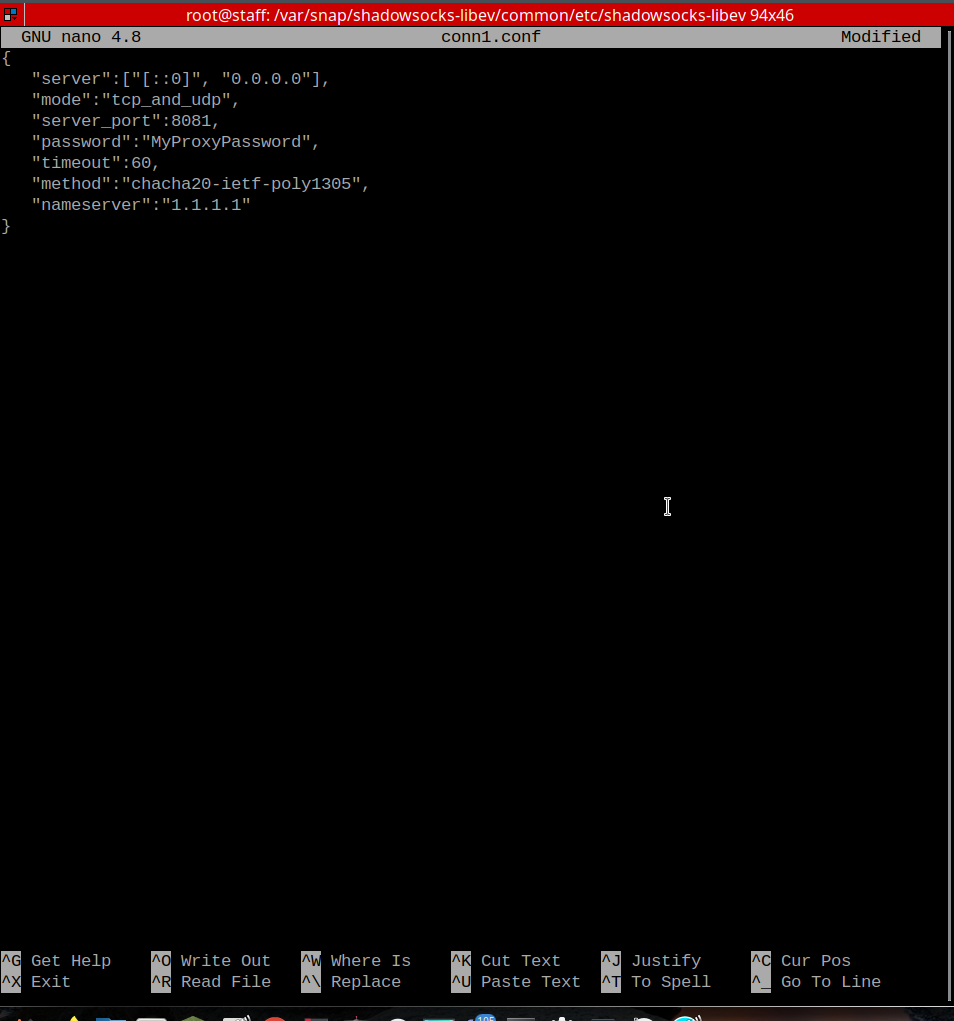
In that directory, run sudo nano conn1.json In that file insert the following. Be sure to change MyProxyPassword to a secure password. Also you can change the 1.1.1.1 to any DNS server you want such as Google’s 8.8.8.8 but I do not recommenced it because ya know… privacy. You can even use your local PiHole installation. Just note, not all clients will automatically pass DNS through the proxy! {
"server":["[::0]", "0.0.0.0"],
"mode":"tcp_and_udp",
"server_port":8081,
"password":"MyProxyPassword",
"timeout":60,
"method":"chacha20-ietf-poly1305",
"nameserver":"1.1.1.1"
}
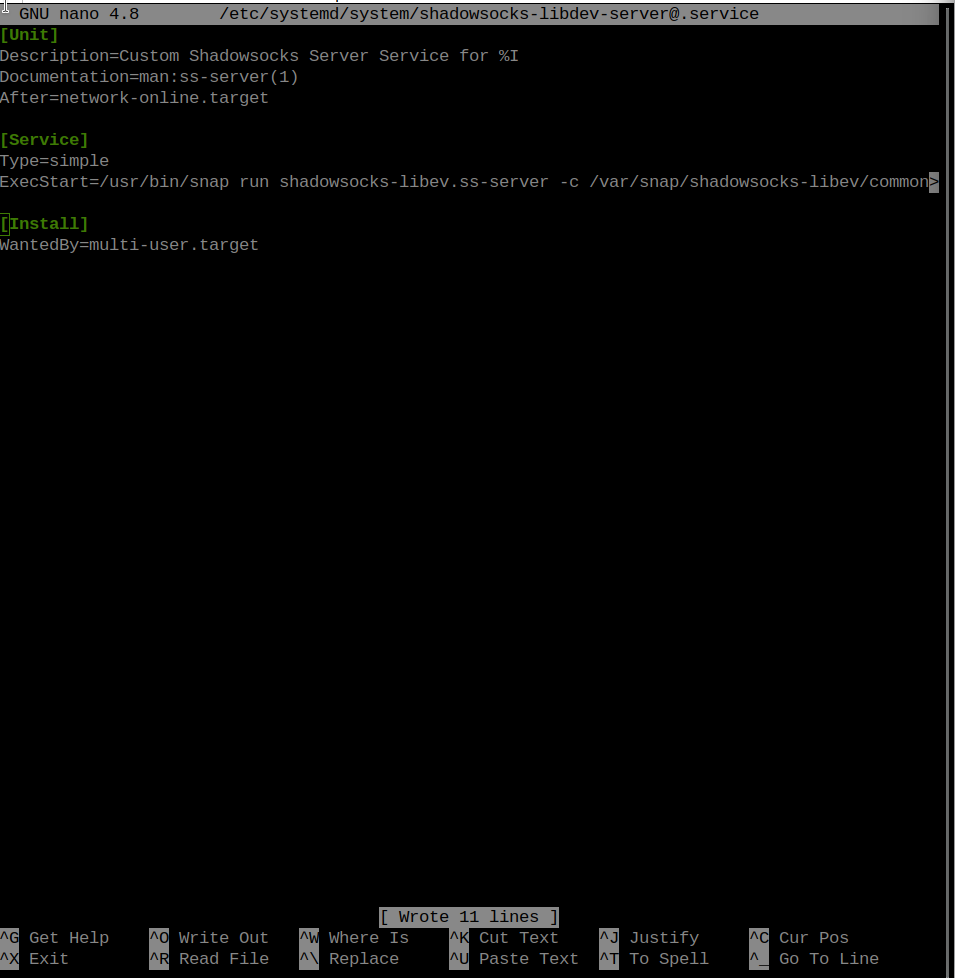
Now run sudo nano /etc/systemd/system/[email protected] and insert the following.[Unit]
Description=Shadowsocks-Libev Custom Server Service for %I
Documentation=man:ss-server(1)
After=network-online.target
[Service]
Type=simple
ExecStart=/usr/bin/snap run shadowsocks-libev.ss-server -c /var/snap/shadowsocks-libev/common/etc/shadowsocks-libev/%i.json
[Install]
WantedBy=multi-user.target
Now all you need to do is run sudo systemctl enable --now shadowsocks-libev-server@conn1 to start the service and enable it at startup! Then to open up your firewall run sudo ufw allow 8081 You can also create other services on different ports if you want to have multiple users with different passwords. If you need to update the server software just run sudo snap refresh shadowsocks-libev

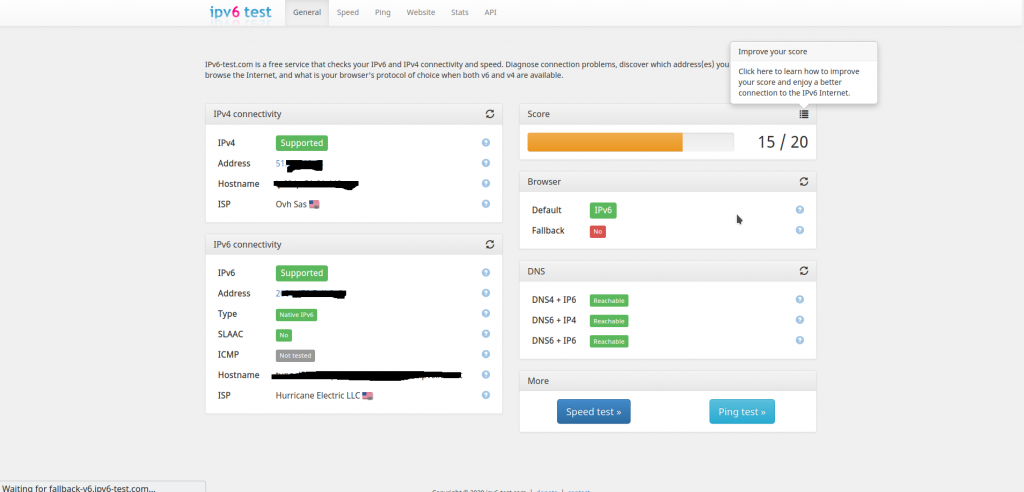
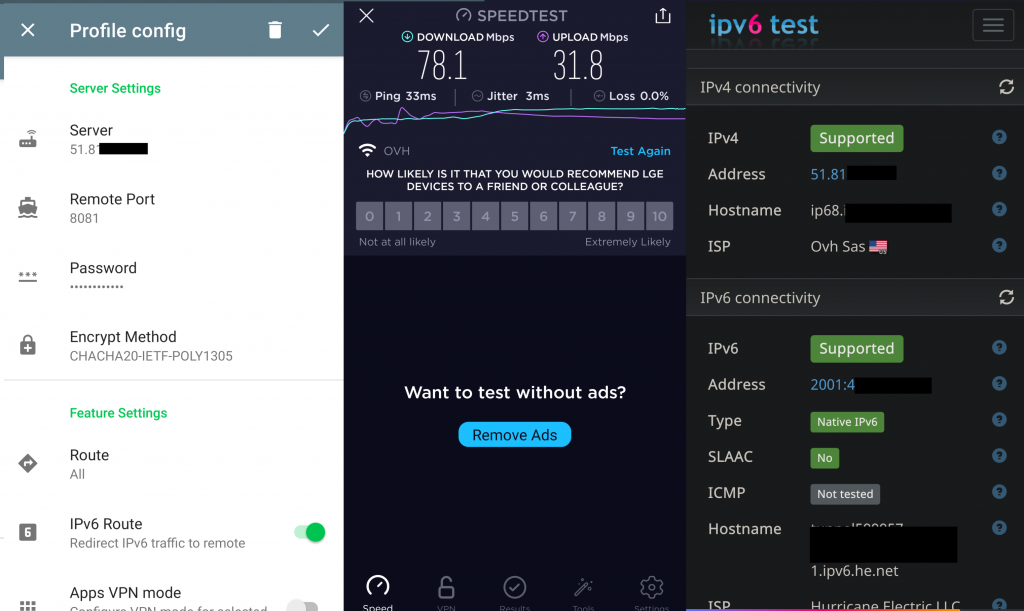
To get connected, Download the app for your device here. I am using Android so here is what I did. I installed Shadowsocks Beta then I configured my app as seen below. As a bonus, here is a Speedtest and IP check as well. If you setup the proxy just like in this tutorial then set it up like this. Make sure you type your password in correct and be sure to choose the right encryption algorithm!
You can also use the “Outline VPN” app which is available with no ads on iOS, Android, Mac, and PC and it acts more like a VPN. But you need to generate a Shadowsocks URI (starts with ss://) which you can do by pressing connection -> share in ShadowSocksQt. If you don’t use ShadowSocksQt then you can use this. It is safe, secure, and it runs on your own browser. If you still don’t feel secure using the demo page then feel free to download the files from Github and open the index.html file in your web browser. Next you need to download the Outline App. You can get it through your app stores or through their website by navigating to the “Start Connecting” section towards the bottom of the page and clicking on the link for your Operating System.
NOTE: Only enable IPv6 if you have it setup on your VPS either natively or through a tunnel service. Also if you want to use a custom DNS server make sure to set it up in the ShadowSOCKS app.
OpenSSH as well as newer sshd servers are like security “Swiss Army knives” that support all types of secure communications features out of the box such as Secure Shell, SCP/SFTP, SSH Proxy, and even a SOCKS5 proxy. What is nice about this is that there is no special additional server-side configuration necessary. Since SSH uses the user accounts on the server you just need to create user accounts on your system like you would with any other Linux user and with the powerful encryption that SSH comes built in with you can rest assured your data is protected and you are not sharing streams with other users making this one of the most simple and quickest to setup proxy solution in the list and allows you to easily use your vps for hosting other applications without worrying about installing proxy programs that use other ports.
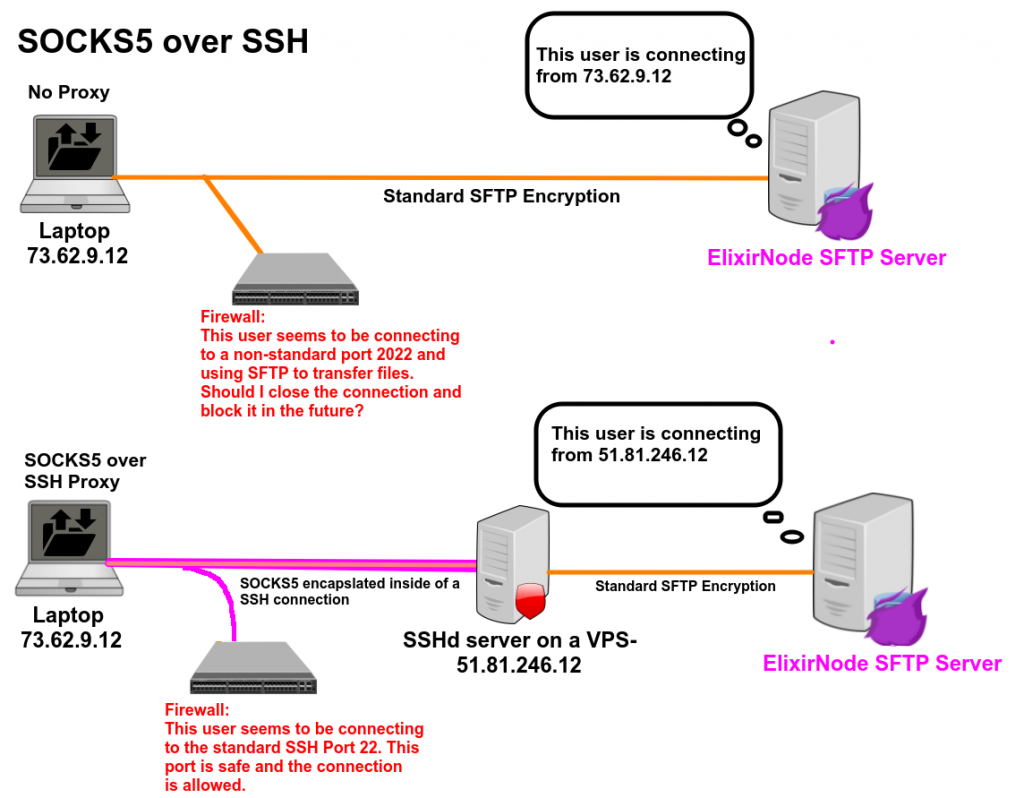
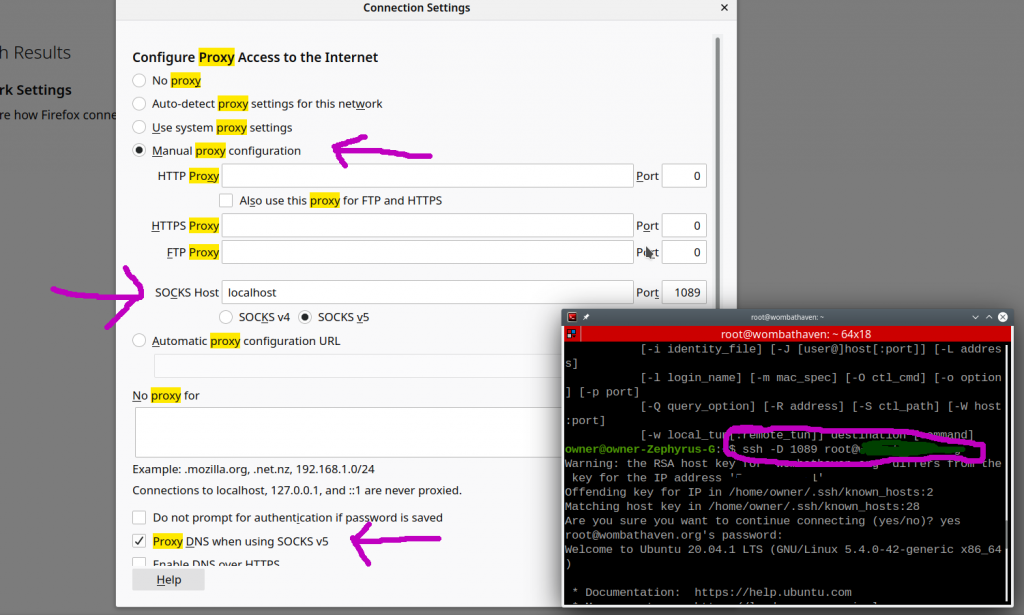
Most modern operating systems including Windows and MacOS have SSH clients already installed. All you need to do is run one command and set up your client! Here is the command to run it on your local machine. ssh -D port username@ip_address so for example it is ssh -D 1089 [email protected] this will connect to to your SSH server while reserving port 1089 on your local machine to act as a local proxy server. It’s up to you what port you want to use. From there you can just set up your application or system’s SOCKS5 proxy client. When you are ready to disconnect just change your application’s proxy settings back to “no proxy” and close the terminal running SSH.
If you want to share the proxy server with the same network as your PC you can use ssh -D lanip:port username@ip_address so for me that would be ssh -D 10.0.51.3:1089 [email protected] since my local IP for my laptop is 10.0.51.3. This allows you to use connect a device like your cell phone to your proxy server but note the data that between the phone and LAN computer that is connected to the proxy is not encrypted.
For Android users, you can use a combination of SocksDroid and ConnectBot to proxy data over ssh like a VPN but due to some technical reasons with ConnectBot, download speeds may be limited to around 15 Mbps. If you want the full speed of your proxy then you need to use Termux instead of ConnectBot and use ssh as you would on Windows, Mac OS, or GNU/Linux.
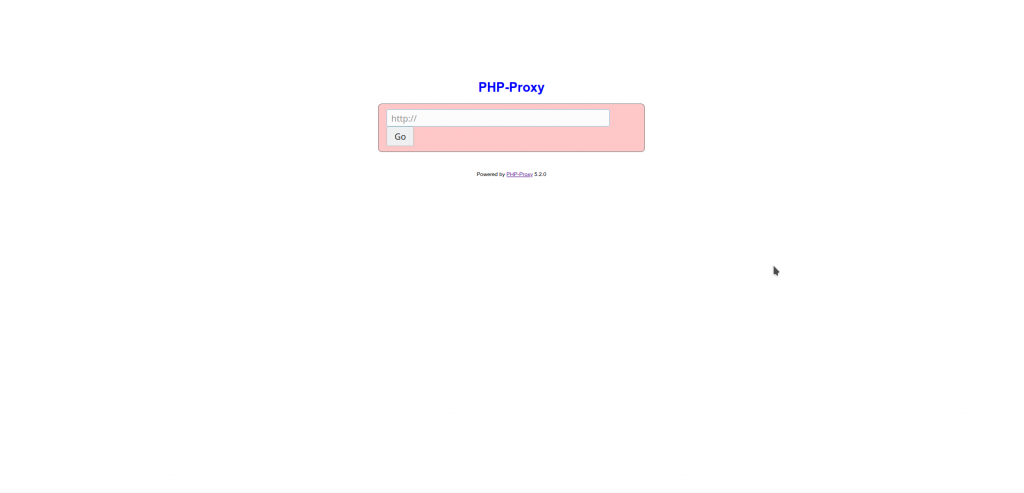
PHP-Proxy is an Open Source in-browser proxy. It allows you to access most sites as if you were connected to the proxy but this method is on suggested for use during an absolute crisis. Like the http proxy it is very insecure unless you use SSL. Services such as Google and DuckDuck Go do not work but Bing does. While I did not test Spotify, I did test Dash Radio and it had no issues. I am assuming there could be some issues with applications that use DRM and while there are some plugins to help you get around them it is not 100%. Also, some IP checkers can easily get your real IP through your browser’s user agent, so be careful while using it. You also will need to secure it using Apache htaccess kind of like the Squid Proxy (We can even use the same file for easier user management). We should also set up https for encryption even if the certificate is self-signed. You may be able to also use ElixirNode’s Web Hosting to run this application but I did not test it and I do not recommend it for security reasons, but hey it may be possible.
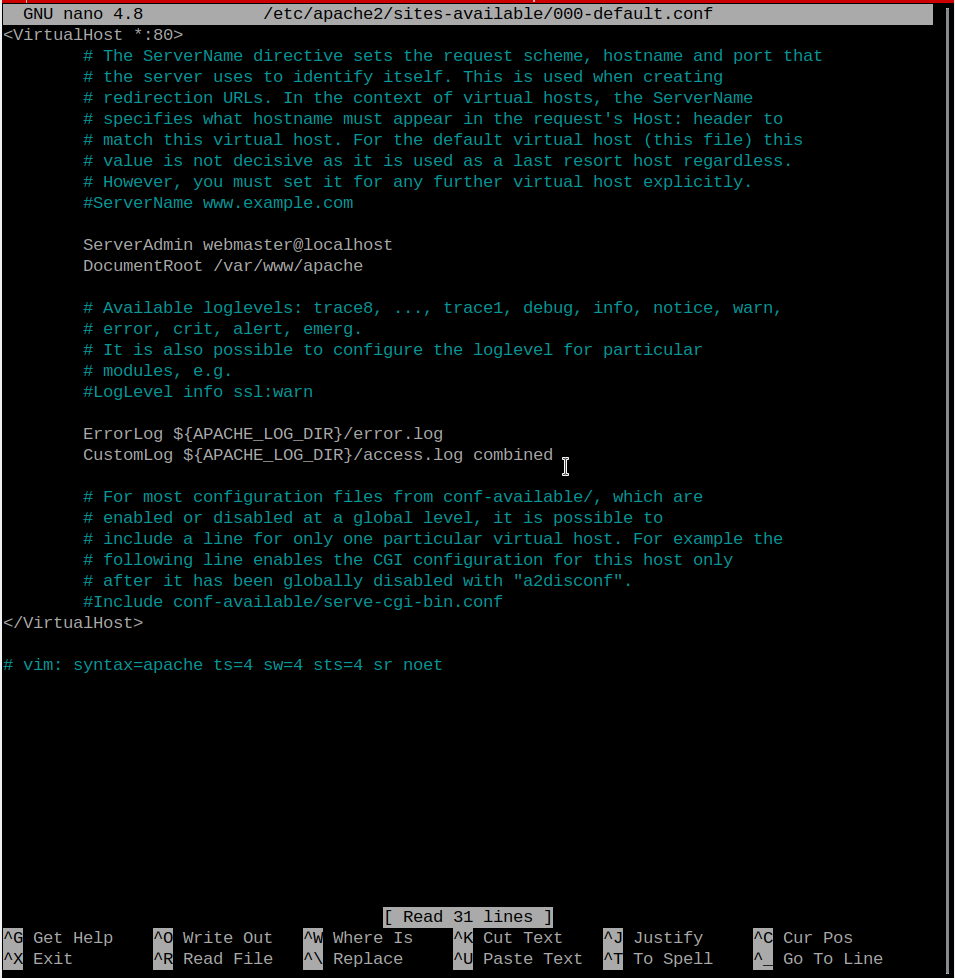
To install on your Ubuntu VPS, run the following commands. sudo apt install apache2 php7.4-common php7.4-curl php7.4-xml php7.4-mbstring libapache2-mod-php7.4 composer Once that is done run cd /var/www/html. If you installed PiHole in there then you need to run mkdir /var/www/apache and then run sudo nano /etc/apache2/sites-available/000-default.conf and change the DocumentRoot /var/www/html to DocumentRoot /var/www/apache Save the file and quit. Then run systemctl reload apache
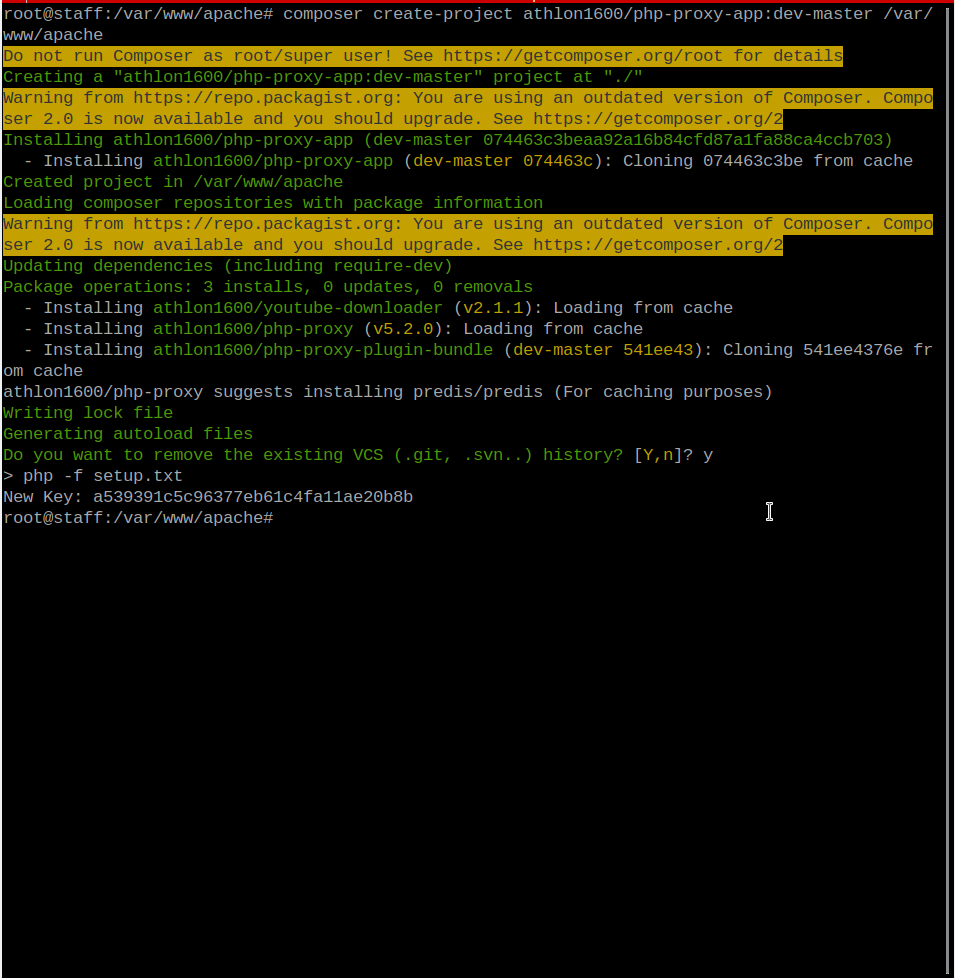
Now we need to install PHP-Proxy. Go to your Document Root, for me it is /var/www/apache like seen above. Inside the folder run composer create-project athlon1600/php-proxy-app:dev-master /var/www/apache and let it do it’s thing. If you are missing anything it will let you know and you can install it.
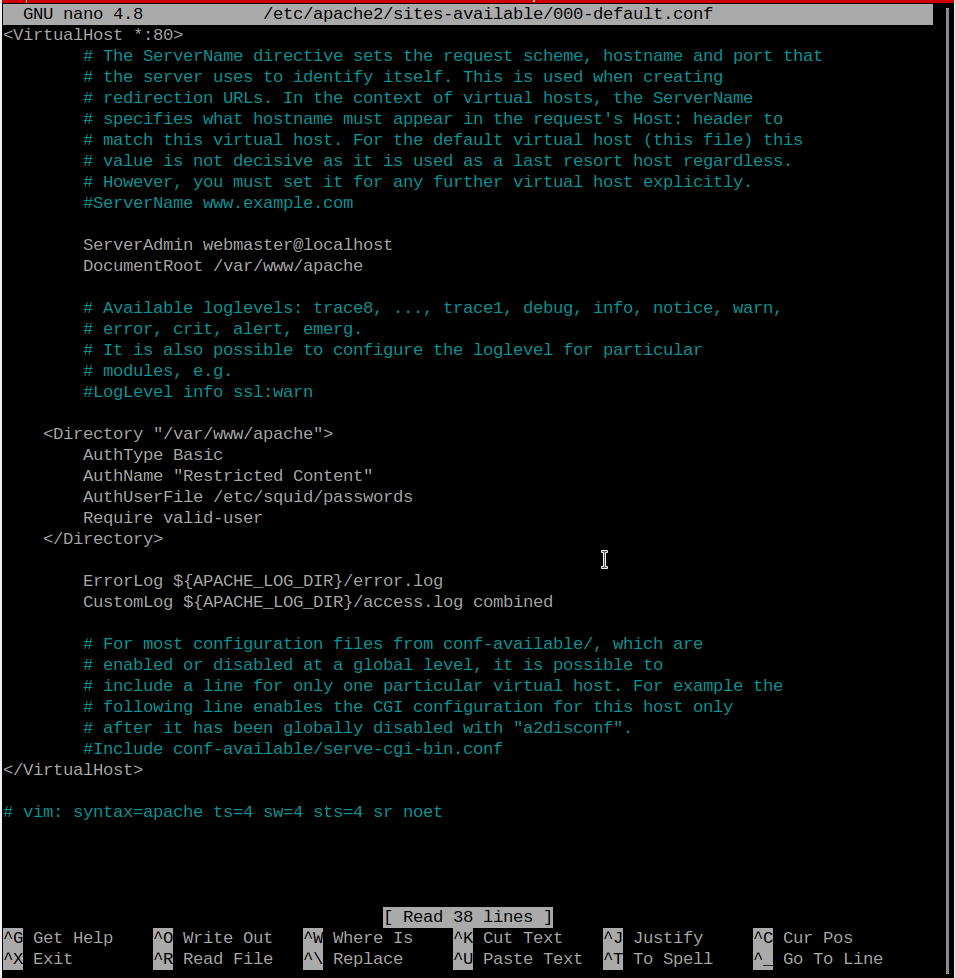
To password protect your web proxy, Edit nano /etc/apache2/sites-available/000-default.conf and insert the following. <Directory "/var/www/apache>
AuthType Basic
AuthName "Restricted Content"
AuthUserFile /etc/squid/passwords
Require valid-user
</Directory>
You may notice I am using the Squid password file we made when setting up squid. Once done run systemctl reload apache2
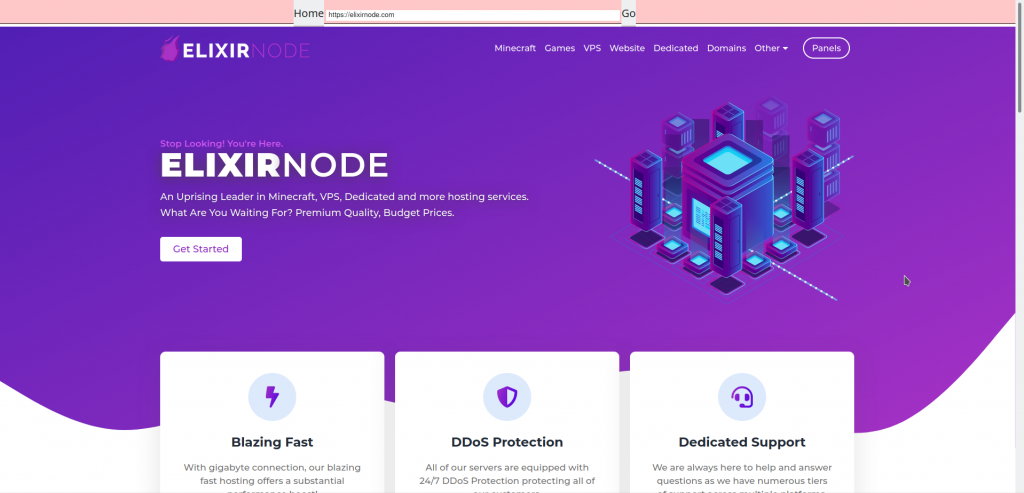
Now go to http://your-domain-or-ip/ and then you should promt you for your credentials. BE WARNED! If you don’t use HTTPS your username and password will be send over plain text like Squid. Once logged in, it should load up for you. You now have access to your proxy straight from the web! Be sure to update the program regularly! You can also set up SSL for added security if you’d like and if you have a FQDN or do not mind generating your own certificates. If you want to generate your own certificates I would suggest buying a separate vps for hosting a Certificate Authority.

Thank you for reading and just remember ElixirNode one of the best vps hosting providers for the price and have some of the best vps for hosting nearly any application you can think of!
If you need further support or have any questions then please contact us.
FREE game server, VPS, web host, dedicated IP & more on most plans!
Get Started