So, you’ve set up your website hosting SSL certificate and your website hosting is available via HTTP and HTTPS, but how can you be sure that your visitors are using the secure, HTTPS standard? This article will guide you through how to make sure your site is always sending visitors through the secure HTTPS standard by using .htaccess through our website hosting and other methods below.
What is SSL?
If you haven’t already set up an SSL certificate on your website hosting, this will be needed in order to allow your users to connect via the secure HTTPS standard. SSL (Secure sockets layer) is a security protocol that allows a website hosting server and a browser to send data that will remain encrypted. In order to use SSL, you need an SSL certificate which comes free with our website hosting.
Why are SSL and HTTPS important?
As stated in the first box, SSL allows HTTPS connection which sends encrypted traffic making it harder for common attacks, such a MITM (man in the middle) to occur, as if someone stole the data it would simply be encrypted and unreadable to the attacker.
What is the .htaccess file?
The .htaccess file contains a set of instructions that tells your website hosting webpage how to behave in certain instances. Common instructions are used to redirect users or rewrite URL’s. An example of this is ReWriteEngine which creates a set of instructions to change the domain you visit. ReWriteEngine is used in this article to change HTTP to HTTPS.
How can I make sure my visitors are connecting via HTTPS?
If you have an active website hosting SSL certificate, you can modify the .htaccess file to ensure your sites visitors are protected by the security of HTTPS. If you’re ready to set this up follow the below instructions. (If your site has Cloudflare, skip to the end of this article!)
STEP 1
Open up cPanel and navigate to the File Manager.

STEP 2
Navigate to the Public_Html folder.

STEP 3
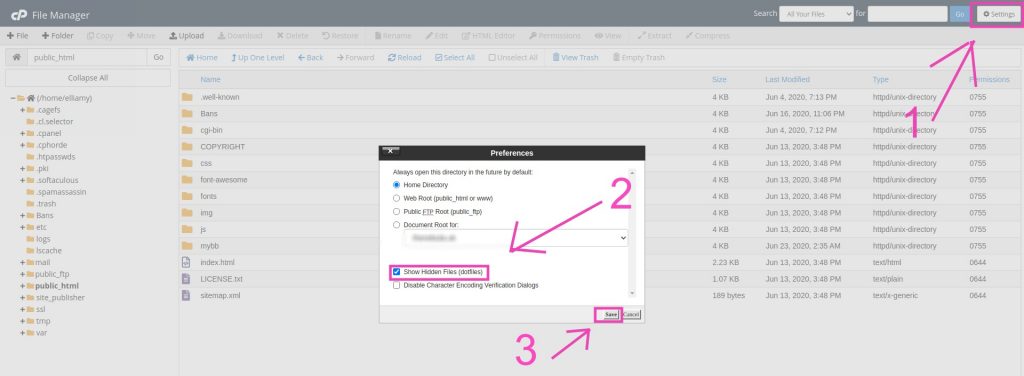
Click on Settings in the top right, then enable Show hidden files, tick the box next to it, then hit Save.

STEP 4
If the .htaccess file isn’t present then you will need to complete this step. If you see the .htaccess file feel free to move on to step 5.
Click on the + File button in the top right corner and create a new file, calling this file .htaccess. From there, insert the following code into the file and save your changes.
<IfModule mod_rewrite.c>
RewriteEngine On
RewriteBase /
RewriteRule ^index.php$ – [L]
RewriteCond %{REQUEST_FILENAME} !-f
RewriteCond %{REQUEST_FILENAME} !-d
RewriteRule . /index.php [L]
</IfModule>
The next step will depend on how you wish to force HTTPS and so I’ve written the next step 3 times and you can choose the option that’s best for you.

[REDIRECT ALL WEB TRAFFIC]
Open the .htaccess file and insert the following code just underneath the line that reads RewriteEngine On. Once complete your file will look like the image below. As always remember to Save your edit.
RewriteCond %{HTTPS} off
RewriteRule ^(.*)$ https://%{HTTP_HOST}%{REQUEST_URI} [L,R=301]

[REDIRECT A SPECIFIC DOMAIN]
Open the .htaccess file and insert the following code just underneath the line that reads RewriteEngine On. Once complete your file will look like the image below. As always remember to Save your edit. In this instance, change yourdomain.com to the domain you want to force HTTPS on.
RewriteCond %{HTTP_HOST} ^yourdomain.com [NC]
RewriteCond %{SERVER_PORT} 80
RewriteRule ^(.*)$ https://www.yourdomain.com/$1 [R,L]

[REDIRECT TO A FOLDER]
Open the .htaccess file and insert the following code just underneath the line that reads RewriteEngine On. Once complete your file will look like the image below. As always remember to Save your edit. In this instance, change yourdomain.com to the domain you want to force HTTPS on and Folder to the folder for which you want to force HTTPS as well.
RewriteCond %{SERVER_PORT} 80
RewriteCond %{REQUEST_URI} folder
RewriteRule ^(.*)$ https://www.yourdomain.com/folder/$1 [R,L]

Force HTTPS with Cloudflare
Do you have a Cloudflare policy on your site? If so then you’re in luck! With all Cloudflare plans, Cloudflare automatically issues your website hosting site with an SSL certificate, and enabling always HTTPS is as easy as the click of a button (literally). Just click the always use HTTPS button (As seen below) which can be found HTTP Strict Transport Security setting on your Cloudflare dashboard.

If you need any further help or have any questions contact us.

